12.20.2009

vintage treats

You'd think that working at home would give me lots of free time to get ready for the holiday. Like doing some decorating, wrapping presents (at least I have presents), and baking. But so far that hasn't happened. Now that Christmas orders have slowed, maybe I'll get some time this week.

I'd like to try this recipe that I clipped from one of those 1960s women's magazines I found at the flea market. I haven't made fudge for ages and coffee, chocolate, and pecans sounds like the perfect combination of flavors to me. Here's the recipe in case you'd like to try it, too. I'll let you know how mine turns out.

fudge

Coffee Dot Fudge

3 cups sugar
1 cup milk
1/2 cup light cream
2 tablespoons instant coffee
1 tablespoon light corn syrup
dash salt
3 tablespoons butter
1 teaspoon vanilla
1/2 6-ounce package semisweet chocolate pieces
1/2 cup broken pecans

Butter sides of heavy 3-quart saucepan. In it combine sugar, milk, light cream, instant coffee, corn syrup, and salt. Heat over medium heat, stirring constantly, until sugar dissolves and mixture come to boiling. Then cook to soft-ball stage (234°), stirring only if necessary. Immediately remove from heat; add butter and cool to lukewarm (110°) without stirring. Add vanilla. Beat vigorously until fudge becomes very thick and starts to lose its gloss. At once stir in chocolate pieces and pecans. Quickly spread in buttered shallow pan or small platter. Score into squares while warm and, if desired, top each with a pecan half. Cut when firm.

Better Homes & Gardens, December 1961

12.17.2009

an amazing embroidery project

I'm not posting this to intimidate those of you who are just learning embroidery. Trust me, some day your work will be good enough to tackle more ambitious projects than the ones you're starting out with. Although this project may be more ambitious than you'll ever do, keep in mind that much of the work was completed by ordinary people who spent a few hours or days of their vacations helping out. I had to share because the finished result is so amazing and gorgeous. The Boston Globe published an article about the project a few days ago but I would have missed it if Kathleen Fasanella hadn't mentioned it on her Fashion-Incubator blog.

Three years ago Plimoth Plantation was planning an exhibition on how America's founders dressed themselves and wanted to re-create a lavishly-embroidered 17th-century women's waistcoat as the centerpiece of the exhibit. They approached Tricia Wilson Nguyen, a specialist in historic needlework, to see if she would lead the ambitious project.


Photo by Ed Nute

“I told them they were totally crazy,’’ said Nguyen. She knew it could take hundreds of people thousands of hours to do the intricate needlework, using a centuries-old embroidery stitch few people know. As if that wasn’t enough challenge, the materials needed - silver gilt threads, hand-cut sequins - had been out of production for centuries and would have to be reinvented.

The design is based on two jackets in the collection of the Victoria & Albert Museum in London. It's a tight-fitting linen waistcoat heavily embroidered with curling vines, silver gilt stems, gold sequins, gold and silver metal lace, and a wild assortment of flowers, leaves, birds, insects, and three-dimensional butterflies.


Photo by Ed Nute

The project, which was unveiled a few days ago, took three years, cost $12,000, and took the embroidery skills of more than 250 people, most of them volunteers, to complete and construct the jacket. You can follow the story of it's creation on Nyguyen’s site Thistle-Threads and on Plimoth Plantation's The Embroiderer's Story.

A few months ago they received some bad news. Because of budget cuts and fund-raising shortfalls, the museum was forced to cancel the exhibition that inspired the jacket. Although Plimoth Plantation will still own it, the jacket will spend the next two years at the Winterthur museum in Delaware, which has a large collection of textiles and needlework. After that, it will return to Plymouth in hopes that the exhibition will be revived.

Nguyen is convinced that the jacket is the most ambitious embroidery project since
Queen Elizabeth ll’s coronation robe and contends it is as fashionable now as it was in the 17th century.

“It’s very stylish,’’ she said. “I hate to say it but, God, it looks great with jeans.’’

I've been wanting to go to Winterthur for ages (it's a couple of hours drive for me) - this might be just the attraction to get me there.

12.03.2009

sticky fingers, sparkly stars

When some of the shop owners where I sell asked for holiday ornaments for their stores, my first reaction was "I don't have time for this." I'd been doing so much sewing and the thought of making one more item wasn't very appealing. But, I hate to disappoint, so I asked myself what else I could do that would fit in with the Primrose Design look. Here's what I came up with—and what I've been working on for the past week. There's a lot of down time with these while they dry in between the steps, so you can easily jump back and forth from other pursuits. I've been doing bookkeeping and I'm quite sure you don't want to hear about that!

star ornament
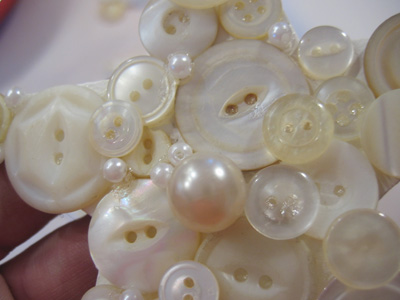
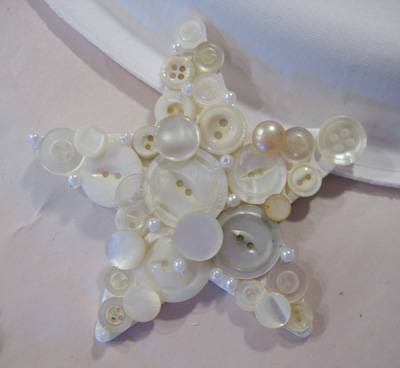
An almost finished ornament—I'll probably add a few more pearls

Here's are the supplies you'll need to make these:

supplies

• flat unfinished wood stars*
• a drill for making the hanging holes
• white acrylic paint (FolkArt 901 Wicker White)
• glue (Aleene's Glass and Bead)
• buttons (white, pearl, rhinestone) in a variety of shapes and sizes
• seed pearls, or pearl beads
• decoupage medium (Plaid Mod Podge)
• sewing needle
• thread for hanging (I used metallic silver)

in production
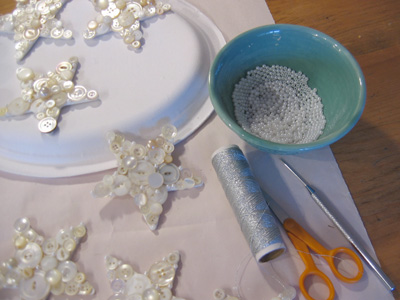
Put some paper down on your workspace—this could get messy!

1. Drill a hole in one point of each star. A power drill really helps because they have a tendency to break or crack. Don't get too close to the edge.
2. Paint each star with acrylic paint—a couple of coats, and don't forget the edges.
3. Now for the buttons. Start at the point with the drilled hole and place a button over it so the holes align. This is where the hanging thread will be added later. You can either apply glue to the wood and then press the button on or apply it to the button itself (that's where the sticky fingers come in). You'll get the hang of arranging them after a while. You'll want a good mix of sizes, shapes, and shades of white, and to cover the surface without leaving too many open spaces or overlapping the outer edges too much. Use smaller buttons on the points and larger one toward the center.
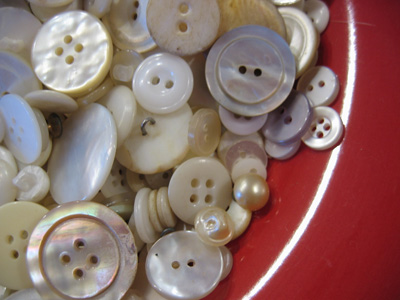
vintage buttons
Vintage buttons!

4. After you have a base layer of buttons, go back and add a few more to cover any open spaces. Flat buttons can rest on top and buttons with shanks are perfect for filling smaller oblong openings. The seed pearls are to fill any really small holes, especially near the edges. You're going for a layered, crusted look—think royal treasure storeroom or pirate's treasure chest—the more the better. I wanted an all-white look for mine but you could add silver or gold beads, trinkets, or charms. It's a small "canvas" so anything smallish will work well.

star ornament
It's hard to be neat with this glue but it's shiny so adds to the sparkle.

5. Once you're happy with the results, let the whole thing dry.
6. Paint the back side with the decoupage medium for a shiny, glossy finish. This works as a glue, too, so you can add a little logo or message that you've printed on paper to the back. If you do this you'll need a few extra coats (with drying time in between).
7. Take a needle and make sure the hanging hole is clear (it gets gummed up with glue and paint and Mod Podge). Then string your hanging thread through the hole and knot it. And you're done.

star ornaments

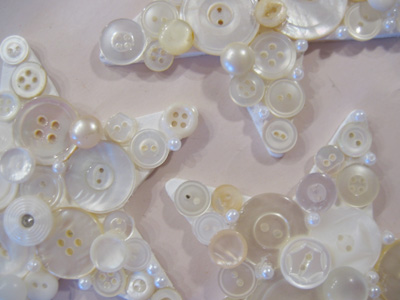
Six of the finished ornaments are off to Hello Bluebird today but I've got plenty of buttons left so I'm going to keep going. They're really pretty and I'm sure I'll find a use for them :)

* You can find these in craft stores like Michaels and A.C. Moore. My local stores only had one size and I wanted something slightly larger, so I bought the 4" size at Woodworks, Ltd. They have a wide variety of shapes including primitive stars (less-sharp points) and hearts.