My back is out today (yes, it snowed again and my poor body just can't take much more) so I'm going to answer a question instead of doing a new stitch this week. A reader emailed a few days ago to ask if I could recommend some embroidery books. I get the information for my posts from several different sources and take pictures as I go along, so I'm not really referencing a particular book. The books I do have are fairly old anyway and you might not be able to find them. But I did a quick search on Amazon to see what's out there. I used the search words "embroidery how-to" and got almost 300 hits, most of which weren't quite what I had in mind (although it's good to know that embroidery is so popular!). Here are a couple that sounded interesting (clicking on the links will take you to Amazon)—
Reader's Digest Complete Book of Embroidery.
Here are more than 100 embroidery stitches to learn, all with step-by-step directions, grouped in stitch families. Includes 20 projects, a special techniques section covering crewelwork, beads, monograms and more, plus over 75 design motifs.
Embroidery Stitches: Over 400 Contemporary and Traditional Stitch Patterns by Mary Webb.
The most exhaustive reference guide to embroidery stitches ever published. In a small format for easy portability, this book contains detailed information on more than 400 embroidery stitches. From the basic to the more intricate and from traditional to contemporary, each stitch is demonstrated through clear, colorful illustrations and detailed, easy-to-follow instructions. Stitches are grouped according to type, making it easy to locate a specific stitch, and presented in order of difficulty, from beginner to advanced.
The Embroidery Stitch Bible by Betty Barnden.
More than 200 stitches are photographed and accompanied by easy to follow charts in this essential reference for embroiderers. From basic cross stitch and chain stitch to more complicated couching, laid work, and drawn thread work, this is the stitch bible for embroiderers wishing to improve their technique and add new dimensions to their work. Stitches are arranged according to their use, including outlines, filling stitches, isolated stitches, motifs, edgings, hems, insertions, flat stitches, backgrounds, and textures. Concealed spiral binding allows embroiderers to read and practice simultaneously.
Dictionary of Embroidery Stitches by Mary Thomas
Mary Thomas' Dictionary of Embroidery Stitches was first published in 1934; regarded as a standard, this book has long been a favorite of novice and experienced embroiderers alike. Later updated by Jan Eaton, it pictures and describes over 400 stitches; arranged by usage, they range from basic outline and border stitches to more complex detached-filling and pulled-fabric stitches. More than 100 color photos show the stitches worked in sampler form, while individual diagrams, color-linked to the photos, illustrate the working method for each stitch. An outstanding reference book that will enable all needleworkers to master the art of embroidery.
While I can't personally recommend these books because I haven't seen them, all sound like good overall reference books for stitches. I'm definitely going to check them out myself. But I'll look at the library first. Once I've determined whether they're "keepers" or not, then I'll buy them for my library.
2.26.2007


2.24.2007
Reading patterns
Carrie-Lee asked "I was wondering with some of the free printable embroidery designs, there doesn't seem to be much detail. Just straight lines outlining the little girl, little boy, etc and I am wondering what stitch do you use with those?"
I talked about this a little here, but I hadn't covered many embroidery stitches at that point and I didn't want to confuse anyone. Now that we've advanced past the basics, I can expand on that post a bit.
When you have patterns separate from their original packaging (like most of the ones you'll find online) it's sometimes hard to figure out what stitches were intended to be used. That's good and bad depending on how you view it. If you're new to embroidery you probably want more direction; if you're more experienced you may see it as an opportunity to try something new.
Since you mentioned a little girl in your question, let's use that as an example. The simple answer is to use outline/stem stitch to follow the drawn lines. Use appropriate colors for her different parts—skin tones, hair, etc. But, if you want to get more creative, here are some ideas:
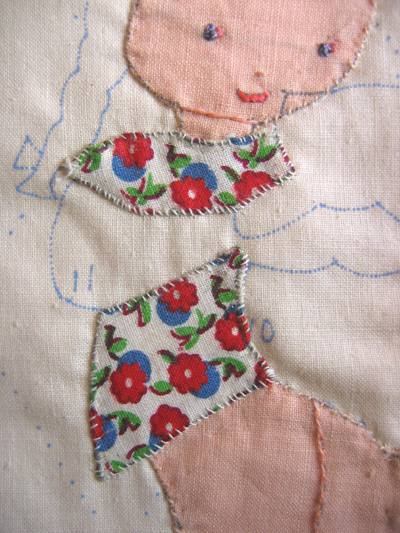
• Choose a print fabric, cut out the shape of her dress, and applique it in place. And then add embroidered details. This is a vintage bib I bought last year that I need to finish. Whoever started it used the same fabric for the binding and ties of the bib.
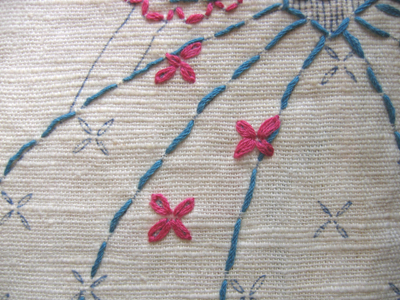
• Use a filling stitch and completely cover the shape of the dress. While it's difficult to cover a large area without distorting the fabric, cross stitches (like in the bonnet) work well, especially if you leave some open spaces. Filling stitches work best in small areas—like her hair. Try one of the braided stitches or French knots packed closely together, like this—

• Work a series of stitches over the blank area in the dress to simulate a pattern—like French knots for polkadots or small lazy-daisy flowers or tiny cross stitches. You see this a lot on the hoop skirts of Southern Belles.
If you're just learning to embroider, work with the basic stitches until you've mastered them. Then, don't be afraid to experiment. Often, when I do a Stitch School post, I'm learning a new stitch along with you. As I do them I can picture interesting uses for them. Where I may have used outline stitch for a basket before, now I'd probably try the woven filling stitch I showed you a few weeks ago.
I talked about this a little here, but I hadn't covered many embroidery stitches at that point and I didn't want to confuse anyone. Now that we've advanced past the basics, I can expand on that post a bit.
When you have patterns separate from their original packaging (like most of the ones you'll find online) it's sometimes hard to figure out what stitches were intended to be used. That's good and bad depending on how you view it. If you're new to embroidery you probably want more direction; if you're more experienced you may see it as an opportunity to try something new.
Since you mentioned a little girl in your question, let's use that as an example. The simple answer is to use outline/stem stitch to follow the drawn lines. Use appropriate colors for her different parts—skin tones, hair, etc. But, if you want to get more creative, here are some ideas:
• Choose a print fabric, cut out the shape of her dress, and applique it in place. And then add embroidered details. This is a vintage bib I bought last year that I need to finish. Whoever started it used the same fabric for the binding and ties of the bib.
• Use a filling stitch and completely cover the shape of the dress. While it's difficult to cover a large area without distorting the fabric, cross stitches (like in the bonnet) work well, especially if you leave some open spaces. Filling stitches work best in small areas—like her hair. Try one of the braided stitches or French knots packed closely together, like this—
• Work a series of stitches over the blank area in the dress to simulate a pattern—like French knots for polkadots or small lazy-daisy flowers or tiny cross stitches. You see this a lot on the hoop skirts of Southern Belles.
If you're just learning to embroider, work with the basic stitches until you've mastered them. Then, don't be afraid to experiment. Often, when I do a Stitch School post, I'm learning a new stitch along with you. As I do them I can picture interesting uses for them. Where I may have used outline stitch for a basket before, now I'd probably try the woven filling stitch I showed you a few weeks ago.
2.19.2007
Stitch School: Raised Fishbone
Stitch School has moved to it's very own space on the web! You'll now find the Raised Fishbone Stitch post here. Comments are now closed on this post; if you'd like to leave a comment please do so on the new one.
new sachets
Wow, I've had almost 200 signups on my website for the Happily Handmade Giveaway, many of them through this blog. So, thank you! If you need a bit more incentive to sign up (and the contest is open until March 31), here's a photo of the five sachets I've donated for the gift baskets:

A couple of them may be familar if you saw my Inspired by Handkerchiefs post where they were still in construction. Yesterday, I added a page for these new vintage handkerchief sachets on my website so they're finally available.

One positive thing about working with handkerchiefs is that many of them have four usable corners, and I can make four sachets in the same design. As you know, most of my work is one-of-a-kind, so this is a new development for me. I actually don't like to repeat designs, but four of something isn't really enough for the boredom factor to kick in. And I've found I'm more productive if I can make things in a production line fashion. Kind of funny, though, if you could see my very low-tech studio :)
This flurry of creative activity has just about depleted my stash of hankies so you know what's moved to the top of my vintage-things-to-look-for list. I'm looking forward to all of this recent snow melting so I can get back out there and do some much-needed treasure hunting.
A couple of them may be familar if you saw my Inspired by Handkerchiefs post where they were still in construction. Yesterday, I added a page for these new vintage handkerchief sachets on my website so they're finally available.
One positive thing about working with handkerchiefs is that many of them have four usable corners, and I can make four sachets in the same design. As you know, most of my work is one-of-a-kind, so this is a new development for me. I actually don't like to repeat designs, but four of something isn't really enough for the boredom factor to kick in. And I've found I'm more productive if I can make things in a production line fashion. Kind of funny, though, if you could see my very low-tech studio :)
This flurry of creative activity has just about depleted my stash of hankies so you know what's moved to the top of my vintage-things-to-look-for list. I'm looking forward to all of this recent snow melting so I can get back out there and do some much-needed treasure hunting.
2.16.2007
Studio Friday: Drawing a blank!
It's one of the most feared events in the life of an artist. Sometimes it can take a long time to overcome this sudden stop of the creative juices. What do you do? How do you act and react? How do you get back to splashing around in all colours? Do you fight it or work with it?
My head is so full of ideas that this rarely happens to me. But, when I'm feeling blocked, I pull out my idea notebooks or go through my piles of fabrics and linens, and I can usually find something to inspire me and pull me back in.
If that still doesn't work, then I don't fight it. Sometimes we just need a break from our everyday routine. I like to walk in the woods behind my house, usually with my camera in hand as it forces me to really look at my surroundings. Sometimes I'll do a short roadtrip to a local antique mall or junk store to hunt for materials to inspire me. For me, the blocks don't last very long and I've stopped getting stressed about them.
When you have your own business there are so many things that need to be done that aren't creative so, on days when I'm not feeling very inspired, I'll work on mundane tasks. Like ironing, or photographing products, or updating my books for taxes. I get impatient with these kinds of tasks when I am inspired, so it's the perfect thing when I'm not. Or maybe it's that they're so boring :)
Read more Studio Friday posts here. And happy second birthday, Studio Friday!
My head is so full of ideas that this rarely happens to me. But, when I'm feeling blocked, I pull out my idea notebooks or go through my piles of fabrics and linens, and I can usually find something to inspire me and pull me back in.
If that still doesn't work, then I don't fight it. Sometimes we just need a break from our everyday routine. I like to walk in the woods behind my house, usually with my camera in hand as it forces me to really look at my surroundings. Sometimes I'll do a short roadtrip to a local antique mall or junk store to hunt for materials to inspire me. For me, the blocks don't last very long and I've stopped getting stressed about them.
When you have your own business there are so many things that need to be done that aren't creative so, on days when I'm not feeling very inspired, I'll work on mundane tasks. Like ironing, or photographing products, or updating my books for taxes. I get impatient with these kinds of tasks when I am inspired, so it's the perfect thing when I'm not. Or maybe it's that they're so boring :)
Read more Studio Friday posts here. And happy second birthday, Studio Friday!
2.15.2007
white out
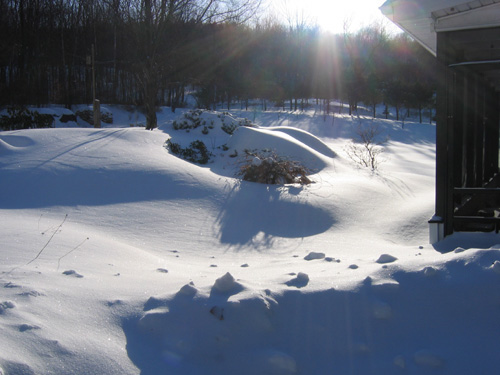
This is what 15 inches of snow looks like. Our first real storm this winter, and all within a 24 hour period! I had the snowblower out twice yesterday because I figured I'd have more trouble the deeper the snow got. To the right in the picture is the corner of the screened porch and the snow is almost up to the part where the screen starts. Yikes! The pictures are from this morning and you can see more of them on my Flickr page.
By last night I was exhausted and freezing cold—you know that feeling that you just can't get warm. I curled up on the couch near the woodstove, with a blanket and my two cats curled up near my feet. Very cozy. And I finished one book—Skylight Confessions by Alice Hoffman (love her stuff) and started another—The Saffron Kitchen by Yasmin Crowther (a first novel for her). Good thing I got to the library this week!
2.14.2007
Stitch School: Fishbone
Stitch School has moved to it's very own space on the web! You'll now find the Fishbone Stitch post here. Comments are now closed on this post; if you'd like to leave a comment please do so on the new one.
2.10.2007
Studio Friday: The perfect art book
"As I was talking about books so much lately... if there was the ideal book for you as an artist on studios and life as an artist what would be the absolute most important thing in your eyes for it to have in it? What kinds of topics, elements, images would you love to have in it? A few words from your favourite artist as well? What would inspire you, what would support you, give you courage? Would you like it to be a big book with tons of pages or a small book?"
Reading over the question again this morning, I think I missed the part about the book being about studios and life as an artist. I got stuck at the title. So I didn't really answer the question properly. But I'm already late and I'm sticking to my original plan :)
An art book should have beautiful photographs or drawings, of course. We expect to see the art itself. But what really interests me is seeing into the artists world and reading about their process. How does their personal environment inspire their work? How do they get from here (thought) to there (finished piece)? It should feel personal and conversational, like blog posts often do.
I have a couple of books like this that I return to again and again. One is called The Undercliff: A Naturalist's Sketchbook of the Devon to Dorset Coast by Elaine Franks and it's designed to look like pages from a sketchbook. Interspersed among the drawings are little hand-lettered paragraphs with stories and observations about the subjects she's drawn. It feels like a diary—very personal and as if you're peeking over her shoulder. I could spend hours admiring the detail she captures in each drawing.
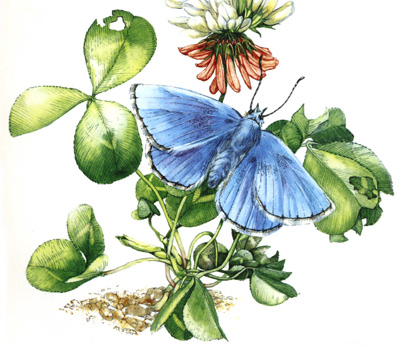
Common Blue Butterfly, © Elaine Franks
Another book I love is Patchwork Folk Art by Janet Bolton, who creates fabric collages that are beautiful in their simplicity. In it she talks about how she begins with simple sketches (beautiful, too), then moves on to choosing shapes, fabrics and details, and finally to how she presents the final piece.
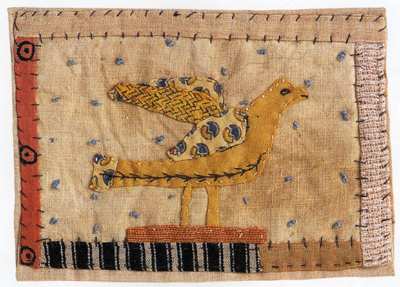
The Small Bird,© Janet Bolton
I buy a lot of art and craft books (probably too many) and I'm often disappointed. They have nice pictures but nothing that makes me want to return to them again and again. So, the perfect art book, to me, should have substance and depth along with pretty pictures. That's not a bad thing in people either :)
Read more Studio Friday posts here.
Reading over the question again this morning, I think I missed the part about the book being about studios and life as an artist. I got stuck at the title. So I didn't really answer the question properly. But I'm already late and I'm sticking to my original plan :)
An art book should have beautiful photographs or drawings, of course. We expect to see the art itself. But what really interests me is seeing into the artists world and reading about their process. How does their personal environment inspire their work? How do they get from here (thought) to there (finished piece)? It should feel personal and conversational, like blog posts often do.
I have a couple of books like this that I return to again and again. One is called The Undercliff: A Naturalist's Sketchbook of the Devon to Dorset Coast by Elaine Franks and it's designed to look like pages from a sketchbook. Interspersed among the drawings are little hand-lettered paragraphs with stories and observations about the subjects she's drawn. It feels like a diary—very personal and as if you're peeking over her shoulder. I could spend hours admiring the detail she captures in each drawing.
Common Blue Butterfly, © Elaine Franks
Another book I love is Patchwork Folk Art by Janet Bolton, who creates fabric collages that are beautiful in their simplicity. In it she talks about how she begins with simple sketches (beautiful, too), then moves on to choosing shapes, fabrics and details, and finally to how she presents the final piece.
The Small Bird,© Janet Bolton
I buy a lot of art and craft books (probably too many) and I'm often disappointed. They have nice pictures but nothing that makes me want to return to them again and again. So, the perfect art book, to me, should have substance and depth along with pretty pictures. That's not a bad thing in people either :)
Read more Studio Friday posts here.
2.06.2007
an old favorite
There are times, mostly during the winter, that I don't make it to the library. I intended to go inside last week when I dropped off my books, but the police had the street blocked off (?) and I drove around on a fruitless search for a parking space. I gave up looking, slipped my books into the drive-up book drop, and went on my way.
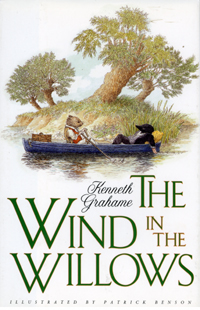
But, that left me with nothing new to read. So, I revisited an old favorite from my bookshelves—The Wind in the Willows by Kenneth Grahame. I'd read this a long time ago and picked up this newly-illustrated version at a book sale a couple of years ago.
It's been on my mind to reread this since my friend Camilla posted a picture of one of those weird English animals that we don't seem to have here in the states. When I asked what it was she said it was the same creature that Mr. Rat was based on—a water rat. Perhaps we do have them here but I've never seen one. This week she posted a picture of a toad (just like Mr. Toad!) on her new gardening blog.
Anyway, great book and worth a visit if you've never read it or can't remember when you did. I love the black and white cross-hatchy illustrations done by Patrick Benson in this version. He also did the art for the sequel The Willows in Winter by William Horwood, which I have not read and will add to my running list of books to look for. Yes, I have one of those and regularly carry it with me to the library!
But, that left me with nothing new to read. So, I revisited an old favorite from my bookshelves—The Wind in the Willows by Kenneth Grahame. I'd read this a long time ago and picked up this newly-illustrated version at a book sale a couple of years ago.
It's been on my mind to reread this since my friend Camilla posted a picture of one of those weird English animals that we don't seem to have here in the states. When I asked what it was she said it was the same creature that Mr. Rat was based on—a water rat. Perhaps we do have them here but I've never seen one. This week she posted a picture of a toad (just like Mr. Toad!) on her new gardening blog.
Anyway, great book and worth a visit if you've never read it or can't remember when you did. I love the black and white cross-hatchy illustrations done by Patrick Benson in this version. He also did the art for the sequel The Willows in Winter by William Horwood, which I have not read and will add to my running list of books to look for. Yes, I have one of those and regularly carry it with me to the library!
2.05.2007
Stitch School: Roumanian
Stitch School has moved to it's very own space on the web! You'll now find the Roumanian Stitch post here. Comments are now closed on this post; if you'd like to leave a comment please do so on the new one.
2.03.2007
spontaneity, or lack thereof
Q: Do you make a conscious effort to match your fabrics and notions or is that inherent in your taste?
Oh, I so wish I could be spontaneous and just throw together a crazy mix of things and have it work. But, I’m not. While I’m not exactly matchy-matchy (in clothing or fabric) I do like things to coordinate.
When I'm embroidering a piece myself to use in a project I can control the whole process. As I talked about a few days ago, I coordinate the thread colors for the embroidery with the fabrics I'll be using later. But that doesn't work with linens that are already embroidered. Sometimes I'll have the perfect fabric in my stash but not always. Then I have to wait to finish the project until I can locate the accompanying materials. Needless to say I have a lot of partially-completed pillows hanging around my studio.
Some day I’m going to force myself to work more spontaneously. I recently purchased Denyse Schmidt’s Quilts book and I loved one of her suggestions for when you get stuck when choosing fabric combinations:
If you find yourself experiencing too-many-fabrics-to-decide paralysis, try this technique: Cut a swatch from each of the fabrics you’re considering for a project and place them in a paper bag, Give the bag a shake and. without peeking, pick a swatch and use it. It’s surprising how freeing this technique can be, and you may end up with fabric combinations you love but would never have tried. In addition to shaking up your ideas about color, this exercise can make you feel connected (however obliquely) to quiltmakers from bygone days, when too much choice wasn’t an issue.
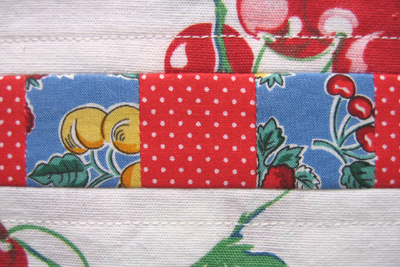
I've started working more with patchwork lately and I think this will be a good start towards spontaneity. And a way to use up those really small fabric scraps that I can't bear to throw out!
Oh, I so wish I could be spontaneous and just throw together a crazy mix of things and have it work. But, I’m not. While I’m not exactly matchy-matchy (in clothing or fabric) I do like things to coordinate.
When I'm embroidering a piece myself to use in a project I can control the whole process. As I talked about a few days ago, I coordinate the thread colors for the embroidery with the fabrics I'll be using later. But that doesn't work with linens that are already embroidered. Sometimes I'll have the perfect fabric in my stash but not always. Then I have to wait to finish the project until I can locate the accompanying materials. Needless to say I have a lot of partially-completed pillows hanging around my studio.
Some day I’m going to force myself to work more spontaneously. I recently purchased Denyse Schmidt’s Quilts book and I loved one of her suggestions for when you get stuck when choosing fabric combinations:
If you find yourself experiencing too-many-fabrics-to-decide paralysis, try this technique: Cut a swatch from each of the fabrics you’re considering for a project and place them in a paper bag, Give the bag a shake and. without peeking, pick a swatch and use it. It’s surprising how freeing this technique can be, and you may end up with fabric combinations you love but would never have tried. In addition to shaking up your ideas about color, this exercise can make you feel connected (however obliquely) to quiltmakers from bygone days, when too much choice wasn’t an issue.
I've started working more with patchwork lately and I think this will be a good start towards spontaneity. And a way to use up those really small fabric scraps that I can't bear to throw out!
2.02.2007
Studio Friday: PORTFOLIO!
"I've never put one together. I would be very interested to see and hear what everyone else has as a portfolio and what makes up one." ~ Jo
I don't talk about this much but I used to be art director of several children's magazines. One of my responsibilities was to review portfolios from illustrators who wanted to do work for us. It's not an exaggeration to say that I've seen hundreds (seems more like thousands) of portfolios. So I know a little about this subject :)
"An effective portfolio accurately represents the designer's abilities and skills in the best possible light. This means that it is clean and well put-together, and while it's nice to try to be a little different, a portfolio should not look gimmicky. The viewer should be more aware of the work than the portfolio itself. An effective portfolio illustrates the designer's self-presentation and communication abilities as well as showcasing the work."
Some basic portfolio "rules"—
• Since you should only show 10-15 samples make sure it's your very best work. Start off with your strongest piece, end with an equally strong one, and have a good solid middle.
• Keep your samples fresh. Anything older than 3 years should be taken out. People want to see what you're doing now, not what you did several years ago.
• Tailor your portfolio to the specific interview and show work that's relevant to that business.
• Have a sample that you can leave with the person you're showing the portfolio to. And make sure your contact info is on it.
I work in two fields so I have two portfolios. But even these are fluid as I add or subtract samples based on the needs of the clients I'm showing them to. My graphic design portfolio has a lot of publication design work but, if I'm meeting with a corporate client, I add more business-oriented samples.
For Primrose I have a book of designs that serves as a carry-along portfolio. It's hard to carry more than one actual pillow when I meet with shop owners about carrying my things in their stores. So, the portfolio serves as a showcase of past designs and hopefully covers the kinds of things they sell. While I like making the funky and colorful pillows best, some shops are more sweet and girly. I try to do some research ahead of time and tailor my samples to what I think will work best in their shop. Here's what the book looks like.
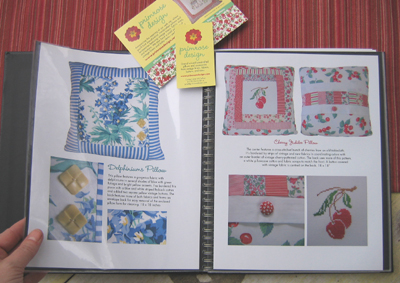
I print up the 8.5 x 11 individual sheets on photo paper and slip them into the plastic sleeves. It takes just minutes to replace old designs with new ones and I can tailor the pages specifically to a particular shop. For a leave-behind, I have business cards and my latest postcard with my contact information on it.
Shop owners (and art directors) are busy people so make the process as easy as possible for them. Anticipate their needs and make sure your portfolio reflects those needs. Pretty simple really :)
See more portfolios here.
I don't talk about this much but I used to be art director of several children's magazines. One of my responsibilities was to review portfolios from illustrators who wanted to do work for us. It's not an exaggeration to say that I've seen hundreds (seems more like thousands) of portfolios. So I know a little about this subject :)
"An effective portfolio accurately represents the designer's abilities and skills in the best possible light. This means that it is clean and well put-together, and while it's nice to try to be a little different, a portfolio should not look gimmicky. The viewer should be more aware of the work than the portfolio itself. An effective portfolio illustrates the designer's self-presentation and communication abilities as well as showcasing the work."
Some basic portfolio "rules"—
• Since you should only show 10-15 samples make sure it's your very best work. Start off with your strongest piece, end with an equally strong one, and have a good solid middle.
• Keep your samples fresh. Anything older than 3 years should be taken out. People want to see what you're doing now, not what you did several years ago.
• Tailor your portfolio to the specific interview and show work that's relevant to that business.
• Have a sample that you can leave with the person you're showing the portfolio to. And make sure your contact info is on it.
I work in two fields so I have two portfolios. But even these are fluid as I add or subtract samples based on the needs of the clients I'm showing them to. My graphic design portfolio has a lot of publication design work but, if I'm meeting with a corporate client, I add more business-oriented samples.
For Primrose I have a book of designs that serves as a carry-along portfolio. It's hard to carry more than one actual pillow when I meet with shop owners about carrying my things in their stores. So, the portfolio serves as a showcase of past designs and hopefully covers the kinds of things they sell. While I like making the funky and colorful pillows best, some shops are more sweet and girly. I try to do some research ahead of time and tailor my samples to what I think will work best in their shop. Here's what the book looks like.
I print up the 8.5 x 11 individual sheets on photo paper and slip them into the plastic sleeves. It takes just minutes to replace old designs with new ones and I can tailor the pages specifically to a particular shop. For a leave-behind, I have business cards and my latest postcard with my contact information on it.
Shop owners (and art directors) are busy people so make the process as easy as possible for them. Anticipate their needs and make sure your portfolio reflects those needs. Pretty simple really :)
See more portfolios here.
2.01.2007
help wanted
Update: Positions filled!
I've mentioned before that I'm going to start offering copies of some of my vintage stamped-for-embroidery patterns for sale on my website. My packaging supplies arrived yesterday and I have five sets printed up and packaged. And I'm looking for a few testers...er, guinea pigs... to give me some feedback.
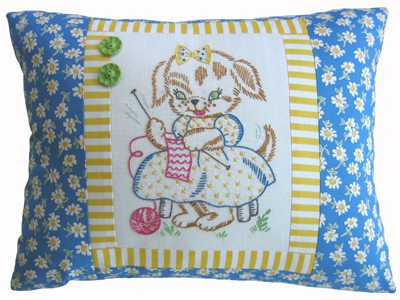
The first five people (in the US please) to email me today at janet@primrosedesign.com with their mailing address will receive a set of four cute animal quilt block embroidery patterns—a bunny playing a drum, a bear tooting a horn, a kitten playing with a spool of ribbon and a puppy knitting. Here's one of them as a completed design on a pillow I made last year:
In exchange, you'll provide me with some honest feedback. Tell me what you think. Did they arrive safely? What would you pay for patterns like this? Did I forget anything important on the instruction sheet? Should a basic stitch guide be included? The patterns will be yours to keep as a thank you for your time.
Serious inquiries only ;)
I've mentioned before that I'm going to start offering copies of some of my vintage stamped-for-embroidery patterns for sale on my website. My packaging supplies arrived yesterday and I have five sets printed up and packaged. And I'm looking for a few testers...er, guinea pigs... to give me some feedback.
The first five people (in the US please) to email me today at janet@primrosedesign.com with their mailing address will receive a set of four cute animal quilt block embroidery patterns—a bunny playing a drum, a bear tooting a horn, a kitten playing with a spool of ribbon and a puppy knitting. Here's one of them as a completed design on a pillow I made last year:
In exchange, you'll provide me with some honest feedback. Tell me what you think. Did they arrive safely? What would you pay for patterns like this? Did I forget anything important on the instruction sheet? Should a basic stitch guide be included? The patterns will be yours to keep as a thank you for your time.
Serious inquiries only ;)
1.29.2007
Stitch School: Granitos
Stitch School has moved to it's very own space on the web! You'll now find the Granitos post here. Comments are now closed on this post; if you'd like to leave a comment please do so on the new one.
1.27.2007
new project
I haven’t shown one of my own projects for a while. I go through periods where I don’t have time to embroider for a few weeks and then I take it up again. But I recently started a new project and wanted to show you and also take the opportunity to talk about color choices. I mentioned in my embroidery basics post that DMC thread comes in about a million colors. That’s a slight exaggeration—it’s actually 454 solids and 18 variegated (and that's just for the six-strand embroidery floss). So, choosing colors for your projects may still seem a bit overwhelming. Personally, I like colors that are “real” and by that I mean colors that are true to life and natural to the subject I'm embroidering.
I started this vintage Vogart dresser scarf earlier this week. The original was very long and, since I'm going to make pillows from it, I cut it in half. I'll save the other half for later.
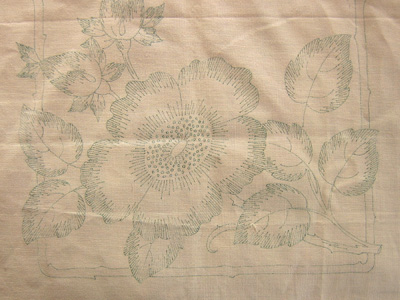
I wasn't sure what the flower was and needed to think about it for a while so I began with the leaves and used a nice leafy green.
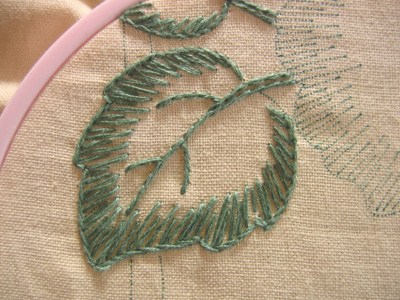
When the leaves were done I couldn't put off the decision on the flower colors any longer. So I got out some of my gardening books and I'm 99% sure it's a wild rose. Flowers in embroidery projects are often stylized so it’s not always easy to figure out what they are.

Wow, look at all those French knots!
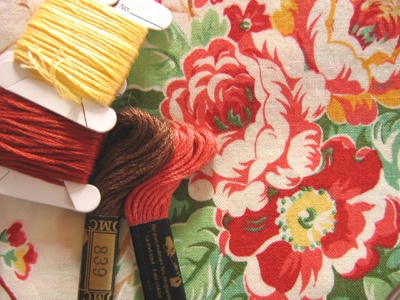
Wild roses are usually pink but I have this gorgeous red and yellow rose print (Forties Retro by Sharon Yenter for In the Beginning Fabrics ©2004) in my stash that I’d really like to use so my roses are going to be red instead. Not entirely accurate but close enough.

So I chose embroidery thread colors to coordinate with this fabric. I’ll use the darker red for the lines radiating out from the center and yellow for the French knots. Did I already mention all those French knots?
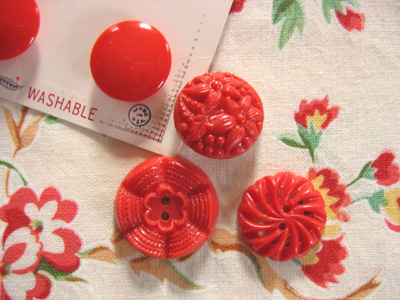
And I’ve even thought ahead to the buttons I'll use to complete the design, although I haven’t decided for sure…
That’s my process. I'm almost always pairing my work with fabrics so I look for my embroidery colors within the prints and patterns. And I really like to play up the lesser colors, too. It's hard to discuss color because it's so personal—your likes, dislikes, and color choices will be much different than mine. But, as a general rule, think about how and where you’ll use what you’re embroidering. If you’re doing tea towels for your kitchen, choose colors that work with your color scheme. Making baby things? Don't just think of the traditional blues and pinks. And if you're into mod then go ahead and do a crazy mix of turquoise, lime green, and hot pink! When it comes to color, it's all good.
I started this vintage Vogart dresser scarf earlier this week. The original was very long and, since I'm going to make pillows from it, I cut it in half. I'll save the other half for later.
I wasn't sure what the flower was and needed to think about it for a while so I began with the leaves and used a nice leafy green.
When the leaves were done I couldn't put off the decision on the flower colors any longer. So I got out some of my gardening books and I'm 99% sure it's a wild rose. Flowers in embroidery projects are often stylized so it’s not always easy to figure out what they are.
Wow, look at all those French knots!
Wild roses are usually pink but I have this gorgeous red and yellow rose print (Forties Retro by Sharon Yenter for In the Beginning Fabrics ©2004) in my stash that I’d really like to use so my roses are going to be red instead. Not entirely accurate but close enough.
So I chose embroidery thread colors to coordinate with this fabric. I’ll use the darker red for the lines radiating out from the center and yellow for the French knots. Did I already mention all those French knots?
And I’ve even thought ahead to the buttons I'll use to complete the design, although I haven’t decided for sure…
That’s my process. I'm almost always pairing my work with fabrics so I look for my embroidery colors within the prints and patterns. And I really like to play up the lesser colors, too. It's hard to discuss color because it's so personal—your likes, dislikes, and color choices will be much different than mine. But, as a general rule, think about how and where you’ll use what you’re embroidering. If you’re doing tea towels for your kitchen, choose colors that work with your color scheme. Making baby things? Don't just think of the traditional blues and pinks. And if you're into mod then go ahead and do a crazy mix of turquoise, lime green, and hot pink! When it comes to color, it's all good.
1.26.2007
Studio Friday: LOOK WHO I FOUND... !
Well the pressure is on because I'm the one who suggested this week's topic!
"I love to discover new artists and often find them through other peoples mentions of them. So, introduce us, in words and/or pictures, to an artist, craftsperson, or writer you admire and that we might not have heard of before (i.e. not a famous one). What do you like about their work? How does it inspire your own work?"
I'd like to introduce you to the work of Brad and Sundie Ruppert. They create whimsical sculptures—everything from birds to cowgirls to angels—from wire and scrap metal and vintage found objects that they discover in their travels around the country. Each sculture is quirky and one-of-a-kind and I love that each time you look at one you find more things to see.

Seeing Eye Dog
They support themselves as freelance graphic designers just as I do and I love how they describe that in their about us section...
"We currently have two careers...one that feeds our kids (freelance graphic design) and one that feeds our souls (Vintage Sculpture). We are lucky enough that those two things work pretty well together and allow us the freedom to travel and pursue our dreams...whatever that might be."
What do I like about their work? I've always loved assemblage (an artistic process in which a three-dimensional artistic composition is made from putting together found objects—sort of a 3-D cousin of collage) and admire artists like Joseph Cornell, Deborah Butterfield, and Janet Bolton. I love the idea of taking other peoples discards and recombining them into something new and wonderful. Isn't that what I do, except with fabric?
All of which inspires me to be a bit more experimental in my own work. And to look at everyday objects in a new way.
See more of their work at Vintage Sculpture. And read about other artists here.
"I love to discover new artists and often find them through other peoples mentions of them. So, introduce us, in words and/or pictures, to an artist, craftsperson, or writer you admire and that we might not have heard of before (i.e. not a famous one). What do you like about their work? How does it inspire your own work?"
I'd like to introduce you to the work of Brad and Sundie Ruppert. They create whimsical sculptures—everything from birds to cowgirls to angels—from wire and scrap metal and vintage found objects that they discover in their travels around the country. Each sculture is quirky and one-of-a-kind and I love that each time you look at one you find more things to see.
Seeing Eye Dog
They support themselves as freelance graphic designers just as I do and I love how they describe that in their about us section...
"We currently have two careers...one that feeds our kids (freelance graphic design) and one that feeds our souls (Vintage Sculpture). We are lucky enough that those two things work pretty well together and allow us the freedom to travel and pursue our dreams...whatever that might be."
What do I like about their work? I've always loved assemblage (an artistic process in which a three-dimensional artistic composition is made from putting together found objects—sort of a 3-D cousin of collage) and admire artists like Joseph Cornell, Deborah Butterfield, and Janet Bolton. I love the idea of taking other peoples discards and recombining them into something new and wonderful. Isn't that what I do, except with fabric?
All of which inspires me to be a bit more experimental in my own work. And to look at everyday objects in a new way.
See more of their work at Vintage Sculpture. And read about other artists here.
1.24.2007
A secret revealed
It's nearly killed me to not talk about this, but I've been keeping a secret since last summer. And having worked on a few book designs myself during my career as a graphic designer, I know how easy it is to be bumped from a book at the last minute. I didn't want to jinx it by talking about it too soon. But I've seen proofs and the book is scheduled for release in a few weeks so I think it's finally safe to announce it to the world!

Back in July I was asked to contribute a project for one of my handkerchief pillows (the one shown here) to a book about modern crafting being written by Amy Spencer and published by Marion Boyars Publishing in the UK. Of course, I said yes, and wrote up a pattern and shipped the pillow off to London. Through a series of mixups that I won't go into detail about, the package went missing. Luckily I had taken photos (as I do with everything I make, because you just never know) and they were able to use them in place of the ones their photographer would have taken. Three months later, the pillow showed up at my door. I had to pay the return shipping from the UK to get it back but I was so relieved to see it.
Anyway, this is the book and it's filled with projects from crafters and small businesses that will be familiar to you. Like Subversive Cross Stitch, Gerbera Designs, Jill Bliss, and Angry Chicken. And I'm honored and thrilled to be part of the group.
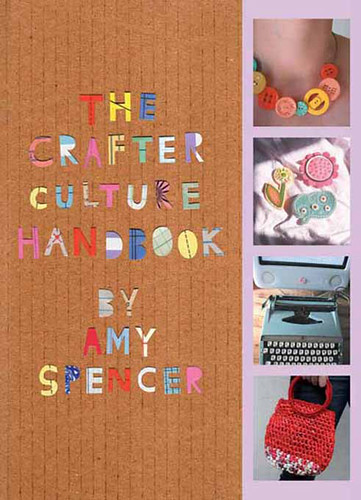
The book is due to be released on February 10th and can be preordered from Amazon now. If you live in the UK you can preorder directly from the publisher and get free shipping. I can't wait until my copy arrives. It won't really feel real until I have the book in my hands :)
1.28 Updated to add that there's a complete project list at the publishers web site.
Back in July I was asked to contribute a project for one of my handkerchief pillows (the one shown here) to a book about modern crafting being written by Amy Spencer and published by Marion Boyars Publishing in the UK. Of course, I said yes, and wrote up a pattern and shipped the pillow off to London. Through a series of mixups that I won't go into detail about, the package went missing. Luckily I had taken photos (as I do with everything I make, because you just never know) and they were able to use them in place of the ones their photographer would have taken. Three months later, the pillow showed up at my door. I had to pay the return shipping from the UK to get it back but I was so relieved to see it.
Anyway, this is the book and it's filled with projects from crafters and small businesses that will be familiar to you. Like Subversive Cross Stitch, Gerbera Designs, Jill Bliss, and Angry Chicken. And I'm honored and thrilled to be part of the group.
The book is due to be released on February 10th and can be preordered from Amazon now. If you live in the UK you can preorder directly from the publisher and get free shipping. I can't wait until my copy arrives. It won't really feel real until I have the book in my hands :)
1.28 Updated to add that there's a complete project list at the publishers web site.
1.22.2007
Stitch School: Coral Stitch
Stitch School has moved to it's very own space on the web! You'll now find the Coral Stitch post here. Comments are now closed on this post; if you'd like to leave a comment please do so on the new one.
1.20.2007
vintage valentines
There's a new group on Flickr for vintage valentines. Come join if you have valentines to contribute or just stop by to look at all the cool old valentines members are posting.

You wear the 'craziest' hats
They nearly drive me 'bats'
Outside of that you're 'okay'
You're my valentine anyway.
See more from my collection here.
You wear the 'craziest' hats
They nearly drive me 'bats'
Outside of that you're 'okay'
You're my valentine anyway.
See more from my collection here.
1.19.2007
Studio Friday: INSPIRING DREAM STUDIO!
We get to see these wonderful studios, - how about not showing our own, but choose among the great studios we know about now? Tell us a little about why you like this studio, what you would like to do if you could work there for a day as it was your own, and, - if it is so, - you have learned from this studio/ artist? ~ mereteveian
©Tara Sgroi (photo)
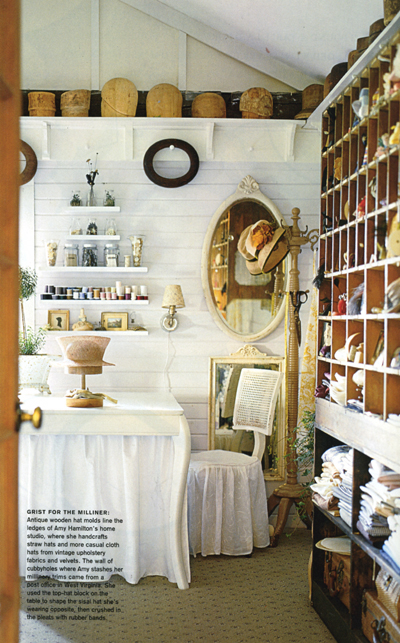
This is the home studio of millinery designer Amy Hamilton. I clipped this picture from a magazine several years ago (Country Living, I think) and have it saved in one of my scrapbooks. It's a separate room off the kitchen of her old farmhouse in Ohio.
I love how clean and white it is. And I'm seriously crushing on those shelves along the righthand wall. Would I be more organized if I had shelves like that? Probably not, but this is a dream, isn't it? I bet when she's working and the studio isn't cleaned up for picture-taking, that her studio is messy, too.
A quote from the accompanying article—
"I have this old wall of post-office cubbies filled with trims... At night, I start putting together colors and textures. I'll develop an idea and the next day, while the children are in school. I'll actually make the hat."
Although we work in totally different areas, her process is very similar to my own. I gather materials for a project, then let them sit overnight (and sometimes longer), walking past a few times and checking whether I still like the combination. If I decide it's not working, it doesn't go any further than that. If I still like it the next day, then it's good to go.
I picture myself in this studio with the sun streaming in the window and my fabrics all organized in their cubbyholes. I reach behind me for the perfect fabrics and embellishments. My work is simple and clean and my mind is uncluttered with stray thoughts and worries. I'm totally focused on the process of creating. Somebody pinch me :)
See more beautiful and inspiring studio dreams here.
©Tara Sgroi (photo)
This is the home studio of millinery designer Amy Hamilton. I clipped this picture from a magazine several years ago (Country Living, I think) and have it saved in one of my scrapbooks. It's a separate room off the kitchen of her old farmhouse in Ohio.
I love how clean and white it is. And I'm seriously crushing on those shelves along the righthand wall. Would I be more organized if I had shelves like that? Probably not, but this is a dream, isn't it? I bet when she's working and the studio isn't cleaned up for picture-taking, that her studio is messy, too.
A quote from the accompanying article—
"I have this old wall of post-office cubbies filled with trims... At night, I start putting together colors and textures. I'll develop an idea and the next day, while the children are in school. I'll actually make the hat."
Although we work in totally different areas, her process is very similar to my own. I gather materials for a project, then let them sit overnight (and sometimes longer), walking past a few times and checking whether I still like the combination. If I decide it's not working, it doesn't go any further than that. If I still like it the next day, then it's good to go.
I picture myself in this studio with the sun streaming in the window and my fabrics all organized in their cubbyholes. I reach behind me for the perfect fabrics and embellishments. My work is simple and clean and my mind is uncluttered with stray thoughts and worries. I'm totally focused on the process of creating. Somebody pinch me :)
See more beautiful and inspiring studio dreams here.
Subscribe to:
Posts (Atom)