
So, for the first time ever, I didn't spend all the cash I'd budgeted for this show. But I got plenty of great stuff in the morning. And who knows, maybe I wouldn't have found anything else even if we had gone back. At least that's what I tell myself :)
It was a vintage fabric kind of day and I got lots of great prints. Like this floral that looks like barkcloth but isn't. The background is the prettiest peachy-pink color—

I also found a fun design with black line birdcages and orange, dark red, and avocado green birds—

And I love the colors on this Waverly Bonded Glosheen fabric—aqua geraniums with lime green flowers and lavender sprays—

Some of my favorite vendors didn't have any buttons this year so these are the only buttons I bought—

I'm starting to love these cute little beaded coin purses and found two —

I also love appliqued things and found this great towel of a woman washing and hanging clothes—
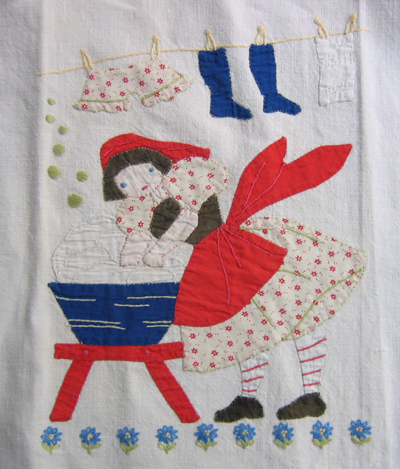
Here's a closeup of the appliqued pantaloons hanging on the clothesline—aren't the embroidered clothespins great?

I got a few aprons, including another with chicken scratch embroidery. I'm seeing that everywhere these days!

I'm going to save my best finds for future posts—both deserve more attention since they're so cool. Stay tuned :)


11 comments:
Can't wait to see what else you got. The birdcage fabric is too cute!!
great finds!
Oh gosh, that appliqued towel is to cute! Looking forward to see the rest of your goodies.
Did you say these weren't your best finds? Wow! I can't wait to see what else you bought. I love the pantaloons!
The bird fabric is fabulous. I would have bought that in a heart beat. I also had one of those vintage purses. So cute.
Wo, I'll have to put this one on my calendar. I didn't know you were so close to me. I do love the dish towel with applique, so darling. Can't wait to see the rest.
peacefulacres.wordpress.com
Oh my goodness, everything you bought is so cute! You have such a good eye.
Hello, love your site. I think it is wonderful and very helpful. I was wondering if you knew what stitch was used to applique the fabric on so that it wouldn't fray? I am learning embroidery so that I can ditch the sewing machine and make my work portable (good with a 1 and 2yr old in tow) but I don't know a lot of basic things that will work by hand, I know that sounds weird. Any help would be greatly appreciated.
Messeis, the applique shown with this post was done by turning under the edge and then tacking it down with small stitches all around. That's the standard way to do it. But, you could also use a blanket stitch:
http://primrosedesign.blogspot.com/2006/11/stitch-school-blanket-stitch.html
I showed an example in that post of an appliqued rabbit with blanket stitch edging. I believe that was also turned under first but you could get around that by spacing your stitches closer together or using a fusing technique to attach your fabric pieces before embroidering.
Thanks, I guess I was hoping for a shortcut. I am currently doing a lowercase "e" for my daughter's shirt and the shape was hard to tuck and hand stitching alone wasn't going to work either because of the fabric. I ended up just doing a quick zig zag on my machine.
Fusing never occurred to me, though I have some iron on that would have worked nicely. Thanks for the idea.
Wow - if they aren't your best finds, I think I need toshopping with you!
Post a Comment