5.14.2007
Stitch School: Portuguese Stem Stitch
Stitch School has moved to it's very own space on the web! You'll now find the Portuguese Stem Stitch post here. Comments are now closed on this post; if you'd like to leave a comment please do so on the new one.


5.10.2007
vintage handkerchief pillows
About a month ago I got an email from Donna who had recently posted about a shopping bag full of old hankies that were her mothers and grandmothers. She didn’t know what to do with them. Robbie, one of her blog readers and also one of mine, commented and referred her to my post about hankies. Thanks Robbie!
After some discussion in which I agreed to make four pillows for her, Donna sent me the hankies—all 144 of them—and I got to work. First up was a good soaking and washing. I figure that any hankies that don’t make it intact through the washing/drying process aren’t fit to make pillows from. Not that I expect my pillows to be thrown around or become the weapon of choice in pillow fights, but I don’t want them to fall apart either.
I lost about 20 of them along the way. And lots more have stains that didn’t wash out or holes in the corners. That’s OK—I’ll cut out the damaged sections and use them for sachets. There were still plenty of good ones left for pillows.
Donna didn’t give me too much guidance, although some customers do and that's fine. One was to be for her son so it shouldn’t be too feminine; the others could be as girly as I wanted them to be. She liked purple.
So, here’s what I came up with:
From a hanky with flower bouquets in the corners, I cut it into quarters and reassembled it so the edges faced inward. I added some yellow vintage buttons (in the center of one of the flowers) and a border of new coral/white floral cotton.

From a hanky with a bouquet of roses tied with a blue ribbon in one corner, I cut it in half diagonally and layered it over another hanky with a crocheted pink and blue edging. A turquoise and pink vintage button stack and two coordinating fabrics complete the design.

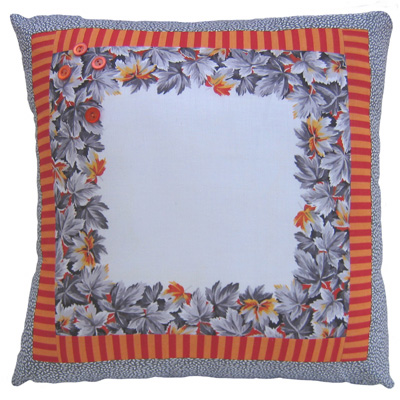
This was the most challenging and also my favorite design. I took a more masculine hanky with autumn leaves in gray and orange, added a border of orange and red striped cotton, a sprinkling of orange buttons in one corner, and finished up with a vintage gray and white print outer border. There’s no getting around the fact that hankies are feminine by nature, but I think I succeeded in not going too girly with this one.
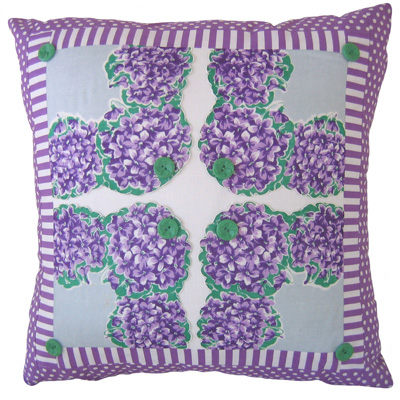
Last but not least…the very purple one. From a hanky with bunches of violets, I cut it into quarters and reassembled it, added a purple-striped border and another of purple polka dots, and kept it from being "too" purple with the addition of eight green buttons in the same shade as the background green of the hanky.
As of yesterday, they’re on their way to their new home. Thanks Donna—hope you love 'em! Next up, one of my embroidered bird pillows for my friend Jenny to give as a baby gift. I planned the design (fabrics and buttons) last night and also started on the embroidery. Yesterday afternoon (which was gorgeous by the way and almost 80 degrees) I photographed lots of vintage goodies for my web site so look for more vintage aprons, linens, buttons and trims in the next week or so.
After some discussion in which I agreed to make four pillows for her, Donna sent me the hankies—all 144 of them—and I got to work. First up was a good soaking and washing. I figure that any hankies that don’t make it intact through the washing/drying process aren’t fit to make pillows from. Not that I expect my pillows to be thrown around or become the weapon of choice in pillow fights, but I don’t want them to fall apart either.
I lost about 20 of them along the way. And lots more have stains that didn’t wash out or holes in the corners. That’s OK—I’ll cut out the damaged sections and use them for sachets. There were still plenty of good ones left for pillows.
Donna didn’t give me too much guidance, although some customers do and that's fine. One was to be for her son so it shouldn’t be too feminine; the others could be as girly as I wanted them to be. She liked purple.
So, here’s what I came up with:
From a hanky with flower bouquets in the corners, I cut it into quarters and reassembled it so the edges faced inward. I added some yellow vintage buttons (in the center of one of the flowers) and a border of new coral/white floral cotton.
From a hanky with a bouquet of roses tied with a blue ribbon in one corner, I cut it in half diagonally and layered it over another hanky with a crocheted pink and blue edging. A turquoise and pink vintage button stack and two coordinating fabrics complete the design.
This was the most challenging and also my favorite design. I took a more masculine hanky with autumn leaves in gray and orange, added a border of orange and red striped cotton, a sprinkling of orange buttons in one corner, and finished up with a vintage gray and white print outer border. There’s no getting around the fact that hankies are feminine by nature, but I think I succeeded in not going too girly with this one.
Last but not least…the very purple one. From a hanky with bunches of violets, I cut it into quarters and reassembled it, added a purple-striped border and another of purple polka dots, and kept it from being "too" purple with the addition of eight green buttons in the same shade as the background green of the hanky.
As of yesterday, they’re on their way to their new home. Thanks Donna—hope you love 'em! Next up, one of my embroidered bird pillows for my friend Jenny to give as a baby gift. I planned the design (fabrics and buttons) last night and also started on the embroidery. Yesterday afternoon (which was gorgeous by the way and almost 80 degrees) I photographed lots of vintage goodies for my web site so look for more vintage aprons, linens, buttons and trims in the next week or so.
5.07.2007
Stitch School: Spider Web
Stitch School has moved to it's very own space on the web! You'll now find the Spider Web Stitch post here. Comments are now closed on this post; if you'd like to leave a comment please do so on the new one.
5.05.2007
We're not in Kansas (city) anymore
An occasional post about quilting
But if we were and it was 1928 we would have been present when a quilt phenomenon got it's start. Beginning that fall, The Kansas City Star and it's sister newspapers, The Weekly Star and The Star Farmer began publishing quilt patterns in a ready-to-use format. Instead of sending away for mail-order patterns, quilters could clip and save favorite patterns for later use. Patterns printed in these newspapers were distributed throughout Kansas, Missouri, Oklahoma, Arkansas, Iowa, and Colorado and, in later years, as far away as North Carolina, Kentucky, and Texas. This widespread network allowed quilters from urban and rural areas to share patterns.
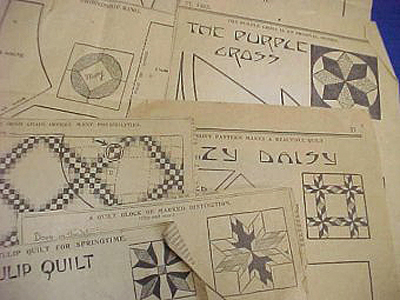
Nell Snead, The Star's woman's and fashion editor was responsible for finding the patterns, which were submitted by local quilters and newspaper readers. The patterns were then professionally created by a series of designers including Ruby Short McKim (an art needlework editor for Better Homes & Gardens), Eveline Foland (who added an Art Deco touch) and The Stars' own fashion illustrator, Edna Marie Dunn.
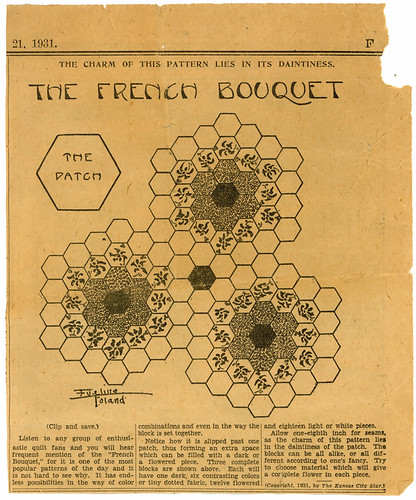
As you can imagine, it's rare to find clippings of these patterns. I bought a bagful of Grandmother's Flower Garden quilt blocks a few years ago and was thrilled to find an original pattern cut from this newspaper inside. Dated 1931, and you can see Eveline Foland's signature in the corner.
By the time the last pattern (Fan of Many Colors) was published in May of 1961, the newspaper had published more than 1000 patterns. Lots of traditional pieced patterns, of course. But also special patterns for appliqued and embroidered quilts, including several series of designs to be sewn together when completed: Santa's Parade Quilt (1929), Memory Bouquet Quilt (1930), Horn of Plenty Quilt (1932) and Happy Childhood Quilt (1932).
Pickledish.com , which seems to be the official site for patterns, has downloadable paper patterns for a few of the designs here. You can occasionally find them on Ebay, both originals for serious collectors (i.e. expensive) and reprinted copies for quilters. If you just want the patterns there are a number of books that reprint them, and you can find them at The Kansas City Store.
Some links to photos of quilts based on Eveline Foland designs:
Memory Bouquet; published in twenty installments in the Kansas City Star and later in the Detroit News, where it was renamed Flower Garden. Another photo of a quilt using the same designs.
Donkey Quilt, designed to commemorate democrat Franklin D. Roosevelt's landslide victory in the 1932 election.
But if we were and it was 1928 we would have been present when a quilt phenomenon got it's start. Beginning that fall, The Kansas City Star and it's sister newspapers, The Weekly Star and The Star Farmer began publishing quilt patterns in a ready-to-use format. Instead of sending away for mail-order patterns, quilters could clip and save favorite patterns for later use. Patterns printed in these newspapers were distributed throughout Kansas, Missouri, Oklahoma, Arkansas, Iowa, and Colorado and, in later years, as far away as North Carolina, Kentucky, and Texas. This widespread network allowed quilters from urban and rural areas to share patterns.
Nell Snead, The Star's woman's and fashion editor was responsible for finding the patterns, which were submitted by local quilters and newspaper readers. The patterns were then professionally created by a series of designers including Ruby Short McKim (an art needlework editor for Better Homes & Gardens), Eveline Foland (who added an Art Deco touch) and The Stars' own fashion illustrator, Edna Marie Dunn.
As you can imagine, it's rare to find clippings of these patterns. I bought a bagful of Grandmother's Flower Garden quilt blocks a few years ago and was thrilled to find an original pattern cut from this newspaper inside. Dated 1931, and you can see Eveline Foland's signature in the corner.
By the time the last pattern (Fan of Many Colors) was published in May of 1961, the newspaper had published more than 1000 patterns. Lots of traditional pieced patterns, of course. But also special patterns for appliqued and embroidered quilts, including several series of designs to be sewn together when completed: Santa's Parade Quilt (1929), Memory Bouquet Quilt (1930), Horn of Plenty Quilt (1932) and Happy Childhood Quilt (1932).
Pickledish.com , which seems to be the official site for patterns, has downloadable paper patterns for a few of the designs here. You can occasionally find them on Ebay, both originals for serious collectors (i.e. expensive) and reprinted copies for quilters. If you just want the patterns there are a number of books that reprint them, and you can find them at The Kansas City Store.
Some links to photos of quilts based on Eveline Foland designs:
Memory Bouquet; published in twenty installments in the Kansas City Star and later in the Detroit News, where it was renamed Flower Garden. Another photo of a quilt using the same designs.
Donkey Quilt, designed to commemorate democrat Franklin D. Roosevelt's landslide victory in the 1932 election.
5.04.2007
vintage transfers and buttons
Do you know of a way to make new transfers from old embroidery patterns? Or do I just need to hand trace old patterns every time I want to use them? We got a bunch of old embroidery patterns at a garage sale and we would really like to figure out a way to use them that doesn't require squinting through fabric to trace a pattern if possible! Thanks!—Sarah
Unfortunately there isn't really a simple way to do it. But, with the right equipment and a bit of computer savvy you can try this: First scan your original transfer pattern. Open the file in a drawing program (I use Photoshop) and clean up (or trace over) the lines—old patterns almost never scan cleanly. Print them out on inkjet transfer paper that you can purchase at office supply stores, then iron on to your fabric. This won't give you the same results as older iron-on transfers because it doesn't wash out, but it's the closest you can get at home.
The vintage buttons are cute, but I don't know how you tell if one is vintage or where to look for them.—Appliejuice
I could probably write a whole post about this subject (maybe I will!) but basically you get a feel for what's vintage by experience. Buttons on cards are easier to identify—the graphics look old-fashioned, the manufacturers aren't in business anymore (or were swallowed up by larger companies), the prices printed on the cards are very low (LOL-anything that sold for 10 cents is definitely vintage!). Early vintage buttons are often attached to their cards with string instead of staples. After you've looked at enough buttons you'll be able to tell.
And once you start looking for them, you'll see them everywhere. I often find plastic baggies full of them at flea markets, jars and tins (like grandma used to have) in antique stores, cards of them on tables at garage sales. Ebay is a good place to look at buttons and you'll see a lot of collector buttons that sell for very high prices. Buttons made of bakelite (an early plastic with very distinct colors) are a good example of this. Look in the Vintage Sewing subcategory of Collectibles.
I'm sorry that I don't always have time to answer your email questions personally, but I often turn your queries into blog posts. So, if you've asked me a question and I haven't answered, check back here. There, I think I've finally caught up :)
Unfortunately there isn't really a simple way to do it. But, with the right equipment and a bit of computer savvy you can try this: First scan your original transfer pattern. Open the file in a drawing program (I use Photoshop) and clean up (or trace over) the lines—old patterns almost never scan cleanly. Print them out on inkjet transfer paper that you can purchase at office supply stores, then iron on to your fabric. This won't give you the same results as older iron-on transfers because it doesn't wash out, but it's the closest you can get at home.
The vintage buttons are cute, but I don't know how you tell if one is vintage or where to look for them.—Appliejuice
I could probably write a whole post about this subject (maybe I will!) but basically you get a feel for what's vintage by experience. Buttons on cards are easier to identify—the graphics look old-fashioned, the manufacturers aren't in business anymore (or were swallowed up by larger companies), the prices printed on the cards are very low (LOL-anything that sold for 10 cents is definitely vintage!). Early vintage buttons are often attached to their cards with string instead of staples. After you've looked at enough buttons you'll be able to tell.
And once you start looking for them, you'll see them everywhere. I often find plastic baggies full of them at flea markets, jars and tins (like grandma used to have) in antique stores, cards of them on tables at garage sales. Ebay is a good place to look at buttons and you'll see a lot of collector buttons that sell for very high prices. Buttons made of bakelite (an early plastic with very distinct colors) are a good example of this. Look in the Vintage Sewing subcategory of Collectibles.
I'm sorry that I don't always have time to answer your email questions personally, but I often turn your queries into blog posts. So, if you've asked me a question and I haven't answered, check back here. There, I think I've finally caught up :)
5.03.2007
rick rack aprons
I haven’t had time these past few months to participate in Amy Karol’s Tie One On apron challenges, but I always look at the new gallery of submissions when she gets them posted.
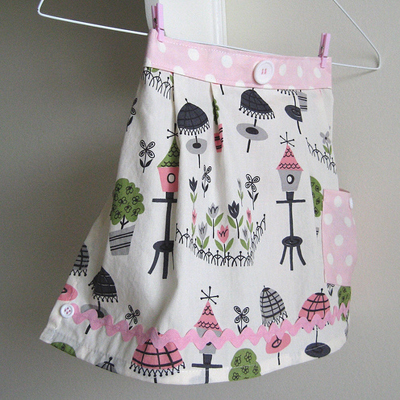
The March/April theme was rick rack and there are some amazing apron submissions. Like this from Amy (love the vintage fabric and giant button!):
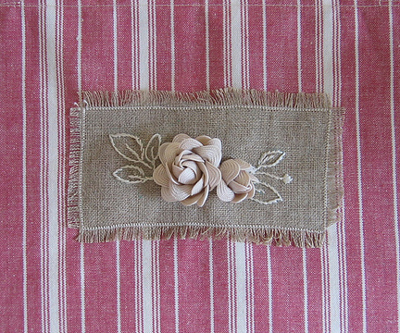
And these wonderful rick rack roses from Chelle:
So many pretty aprons that it was hard to choose just two for this post. But you can see them all here.
The March/April theme was rick rack and there are some amazing apron submissions. Like this from Amy (love the vintage fabric and giant button!):
And these wonderful rick rack roses from Chelle:
So many pretty aprons that it was hard to choose just two for this post. But you can see them all here.
5.01.2007
May Day
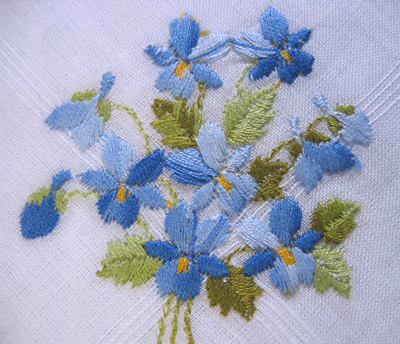
Spring has been a long time coming this year and the only flowers we have so far are a bunch of rather droopy daffodils. So, to find a May Day bouquet for today, I turned to my box of vintage handkerchiefs and found this lovely bunch of tiny blue violets.
But I must gather knots of flowers.
And buds and garlands gay,
For I'm to be Queen o' the May, mother,
I'm to be Queen o' the May."
—Alfred Lord Tennyson
Happy May Day everyone!
But I must gather knots of flowers.
And buds and garlands gay,
For I'm to be Queen o' the May, mother,
I'm to be Queen o' the May."
—Alfred Lord Tennyson
Happy May Day everyone!
4.30.2007
Stitch School: Overcast Stitch
Stitch School has moved to it's very own space on the web! You'll now find the Overcast Stitch post here. Comments are now closed on this post; if you'd like to leave a comment please do so on the new one.
4.26.2007
Darth Amaya?
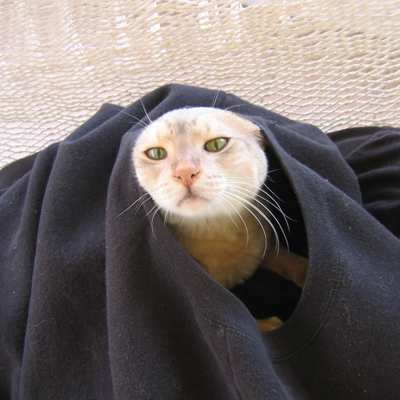
Here's a funny picture of my cat to tide you over until I get a chance to post again.
Due to a series of unfortunate circumstances, both of the magazines I design were due to the printer yesterday. That's not supposed to happen but an editor was on vacation, ads wouldn't print, etc. etc. Problems galore, and it's been so nice outside that all I want to do is be out there. I have a conference call/phone meeting at 10 and then I'm going to take a walk.
We had some fruit trees (two plums and a peach) and blueberry bushes to add to our growing orchard delivered yesterday, too, and I need to get them in the garden temporarily until we can plant them properly on the weekend.
Hope you're all getting a chance to enjoy the spring weather that we're getting—finally :)
Due to a series of unfortunate circumstances, both of the magazines I design were due to the printer yesterday. That's not supposed to happen but an editor was on vacation, ads wouldn't print, etc. etc. Problems galore, and it's been so nice outside that all I want to do is be out there. I have a conference call/phone meeting at 10 and then I'm going to take a walk.
We had some fruit trees (two plums and a peach) and blueberry bushes to add to our growing orchard delivered yesterday, too, and I need to get them in the garden temporarily until we can plant them properly on the weekend.
Hope you're all getting a chance to enjoy the spring weather that we're getting—finally :)
4.22.2007
more embroidery Q & A
I'm off to Philadelphia tomorrow so won't have time to do a full Stitch School post. But I have more embroidery questions from readers and this seemed like a good time to answer them.
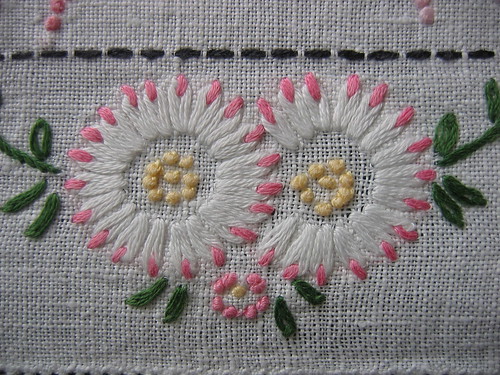
I wonder if you could explain how to do the lazy daisy flower with two contrasting threads. It's the last picture in your lazy daisy instructions. That flower is so beautiful! Just love to be able to learn it. — Irene Heikes
This is the flower that Irene is referring to:
And this is what it looks like on the back:
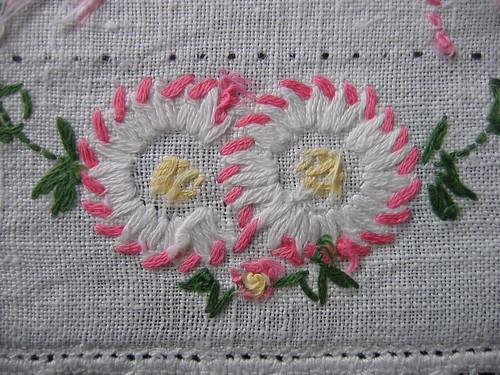
I didn't do this embroidery so I can't be 100% certain of this, but it looks to me like it was done with two needles and two colors of thread. The technique is the same (see lazy daisy post) except that you'll need to hold the loop while you maneuver the second needle to make the small stitch that catches the curve of the loop. That may be a little awkward—it even sounds awkward. My other thought was to do the stitch as you usually would and go back over the catch stitch with your second color. I'm not sure it will cover completely and might be kind of lumpy.
I don't use a hoop. Is that wrong? When I use a hoop, I tend to push up the fabric to get the needle through. I do have a Q-Snap hoop. Maybe I should pull that out of the attic and try again. Will it make the stitches neater? — Appliejuice
Everyone has to find their own best way of doing things and if you've found that embroidering without one works for you, then it's not wrong! Personally I think you get better results with some tension on the fabric but there are some things that I don't use a hoop for—like quilted baby bibs that have enough weight to them already. I do find that some stitches are a bit harder to do in a hoop and often will use a "stabbing" effect with the needle rather than a "skimming the surface" technique, which can cause the fabric distortion that you mentioned. As for neatness, I think that has more to do with the person doing the embroidery :)
I had a question about embroidering on pillowcases and I thought maybe you could help. Embroidering is so much easier when a hoop is used, and with my first three projects I have been able to use one without any problem, but what does a person do when you embroider on either pillowcases or flat sheets when the embroidery is on the edge and you can't get all the fabric in the hoop? How do you keep it taut? — Carrie-Lee
They make very small embroidery hoops that might work for this, but I find that the area they contain is so small that you have to constantly move the hoop. You could try a stretcher frame. But there is another way and this will work for anything that's too small for a hoop. Take some wide strips of fabric and sew them (with long basting stitches so they'll be easy to remove later) onto the edge of your piece. Complete your embroidery, then remove the strips.
Since I began writing this I've received several more questions. So, if you haven't heard back from me, I haven't forgotten you. You'll be in the next batch!
I wonder if you could explain how to do the lazy daisy flower with two contrasting threads. It's the last picture in your lazy daisy instructions. That flower is so beautiful! Just love to be able to learn it. — Irene Heikes
This is the flower that Irene is referring to:
And this is what it looks like on the back:
I didn't do this embroidery so I can't be 100% certain of this, but it looks to me like it was done with two needles and two colors of thread. The technique is the same (see lazy daisy post) except that you'll need to hold the loop while you maneuver the second needle to make the small stitch that catches the curve of the loop. That may be a little awkward—it even sounds awkward. My other thought was to do the stitch as you usually would and go back over the catch stitch with your second color. I'm not sure it will cover completely and might be kind of lumpy.
I don't use a hoop. Is that wrong? When I use a hoop, I tend to push up the fabric to get the needle through. I do have a Q-Snap hoop. Maybe I should pull that out of the attic and try again. Will it make the stitches neater? — Appliejuice
Everyone has to find their own best way of doing things and if you've found that embroidering without one works for you, then it's not wrong! Personally I think you get better results with some tension on the fabric but there are some things that I don't use a hoop for—like quilted baby bibs that have enough weight to them already. I do find that some stitches are a bit harder to do in a hoop and often will use a "stabbing" effect with the needle rather than a "skimming the surface" technique, which can cause the fabric distortion that you mentioned. As for neatness, I think that has more to do with the person doing the embroidery :)
I had a question about embroidering on pillowcases and I thought maybe you could help. Embroidering is so much easier when a hoop is used, and with my first three projects I have been able to use one without any problem, but what does a person do when you embroider on either pillowcases or flat sheets when the embroidery is on the edge and you can't get all the fabric in the hoop? How do you keep it taut? — Carrie-Lee
They make very small embroidery hoops that might work for this, but I find that the area they contain is so small that you have to constantly move the hoop. You could try a stretcher frame. But there is another way and this will work for anything that's too small for a hoop. Take some wide strips of fabric and sew them (with long basting stitches so they'll be easy to remove later) onto the edge of your piece. Complete your embroidery, then remove the strips.
Since I began writing this I've received several more questions. So, if you haven't heard back from me, I haven't forgotten you. You'll be in the next batch!
4.18.2007
surprise!
Look at this cute little package I found in my mailbox today. Wonder what it could be?
It was wrapped so prettily that I had to take a picture first. Isn't that tag perfection?

And inside was a great batch of buttons courtesy of my vintage button swap partner, Mandi. I participated in the first swap last year and was thrilled to sign up again this time. The swap is sponsored by Sally at shim+sons and 170 people from all over the world signed up to be partnered with another button lover. You send 12 buttons and you get 12 buttons back. And people often send extra goodies, too. Like the row of vintage trims in the back—the pink one has kitties on it. And my own package of those sweet little tags—wheee!

So, how did Mandi know that I love flower buttons? This wasn't a surprise thing so I asked her what she liked and she did the same. She was redecorating her kitchen with yellows and oranges so that's what I sent her, along with a tea towel trimmed with vintage feedsack fabric and rickrack. Every kitchen can use a pretty tea towel.

If you want to see some of the other buttons, head over to the Flickr group. And if that doesn't make you want to sign up next time I don't know what will :)
It was wrapped so prettily that I had to take a picture first. Isn't that tag perfection?
And inside was a great batch of buttons courtesy of my vintage button swap partner, Mandi. I participated in the first swap last year and was thrilled to sign up again this time. The swap is sponsored by Sally at shim+sons and 170 people from all over the world signed up to be partnered with another button lover. You send 12 buttons and you get 12 buttons back. And people often send extra goodies, too. Like the row of vintage trims in the back—the pink one has kitties on it. And my own package of those sweet little tags—wheee!
So, how did Mandi know that I love flower buttons? This wasn't a surprise thing so I asked her what she liked and she did the same. She was redecorating her kitchen with yellows and oranges so that's what I sent her, along with a tea towel trimmed with vintage feedsack fabric and rickrack. Every kitchen can use a pretty tea towel.
If you want to see some of the other buttons, head over to the Flickr group. And if that doesn't make you want to sign up next time I don't know what will :)
poor birds
I took this photo on Monday in the thick of the snowstorm that dumped 8 inches of wet, heavy snow on northeast Pennsylvania.
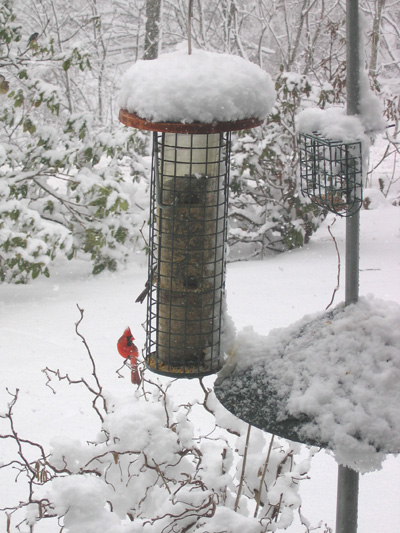
I've never seen so many birds at our feeders—and not just the usual chickadees and cardinals. Cowbirds, goldfinches, and red-winged blackbirds all made an appearance. All are birds that you see occasionally but that prefer other foods than birdseed. I'm not sure what the robins did. I saw a few of them trying to dig through the snow early in the day but they had to give up later.
Last year at this time I was posting pictures of pussywillows and commenting about how warm it was getting—LOL!
I've never seen so many birds at our feeders—and not just the usual chickadees and cardinals. Cowbirds, goldfinches, and red-winged blackbirds all made an appearance. All are birds that you see occasionally but that prefer other foods than birdseed. I'm not sure what the robins did. I saw a few of them trying to dig through the snow early in the day but they had to give up later.
Last year at this time I was posting pictures of pussywillows and commenting about how warm it was getting—LOL!
4.16.2007
Stitch School: Interlaced Band
Stitch School has moved to it's very own space on the web! You'll now find the Interlaced Band Stitch post here. Comments are now closed on this post; if you'd like to leave a comment please do so on the new one.
4.13.2007
what happened to spring?
Sorry for the lack of blogging lately. All this weird weather (it's actually snowing a little here today) has left me feeling kind of blah. I want to be working in my garden and getting inspired by nature. Instead I'm stuck inside, mostly on my computer doing not-so-creative things.
I did get back to Hancock Fabrics yesterday and spent at least an hour going through the entire store. I didn't buy the iron I set out to buy because it was a display model that looked like it had been sitting out for years. They aren't allowing returns on anything and I didn't want to take the chance. But I did buy a professional model to replace the one I bought last year - it's been leaking and spitting a lot lately and I fear it's days are numbered. I got lots of great fabrics, buttons, embroidery floss, and crib quilt batting, too. Our store will be open until June but it's already getting pretty picked over in some departments.
I found out a little more about the bankruptcy. They filed for Chapter 11 which allows them to remain in business but to reorganize the company. Part of that effort is to close 134 stores. They have 400 so it's possible that they won't be closing the store near you. I haven't heard anything about their plans to continue to publish Cutting Edge—if you have a subscription I imagine you'll be hearing from them if they decide to fold.
While I think its sad that they're closing our local store, the market where I live is too saturated. Joann, AC Moore, Michaels, and Hancock Fabrics—all within minutes of each other—is too much for an area that doesn't have a lot of sewers and crafters. Two very old fabric stores closed here in the past couple of years because they couldn't make it any more.
Because we're part of the crafting community and crafting seems to be the hot thing these days, we assume that everyone is doing it and there must be a market for more craft/fabric stores. I think that must depend on where you live—it's certainly not true here. That's OK, though. Computers have opened up the whole world as a source of supplies and there are so many wonderful online shops to buy them from. Shops that can stay small, offer excellent customer service, and focus on what they do best.
I did get back to Hancock Fabrics yesterday and spent at least an hour going through the entire store. I didn't buy the iron I set out to buy because it was a display model that looked like it had been sitting out for years. They aren't allowing returns on anything and I didn't want to take the chance. But I did buy a professional model to replace the one I bought last year - it's been leaking and spitting a lot lately and I fear it's days are numbered. I got lots of great fabrics, buttons, embroidery floss, and crib quilt batting, too. Our store will be open until June but it's already getting pretty picked over in some departments.
I found out a little more about the bankruptcy. They filed for Chapter 11 which allows them to remain in business but to reorganize the company. Part of that effort is to close 134 stores. They have 400 so it's possible that they won't be closing the store near you. I haven't heard anything about their plans to continue to publish Cutting Edge—if you have a subscription I imagine you'll be hearing from them if they decide to fold.
While I think its sad that they're closing our local store, the market where I live is too saturated. Joann, AC Moore, Michaels, and Hancock Fabrics—all within minutes of each other—is too much for an area that doesn't have a lot of sewers and crafters. Two very old fabric stores closed here in the past couple of years because they couldn't make it any more.
Because we're part of the crafting community and crafting seems to be the hot thing these days, we assume that everyone is doing it and there must be a market for more craft/fabric stores. I think that must depend on where you live—it's certainly not true here. That's OK, though. Computers have opened up the whole world as a source of supplies and there are so many wonderful online shops to buy them from. Shops that can stay small, offer excellent customer service, and focus on what they do best.
4.11.2007
get thee to Hancock Fabrics
If you have one near you, that is. The company has filed for bankruptcy and is closing hundreds of their stores, including the one that just opened a year ago at a mall near where I live. I think someone posted about this on their blog but I didn't make the connection until I stopped there today and saw their windows plastered with giant store closing signs.
So, yes, everything is on sale and most things for 50% off! I needed to get back here today so I quickly grabbed a basketful of stuff that I knew I'd use, including the fabric I stopped for. You can bet I'll be heading back very soon—like tomorrow perhaps. I have my eye on a professional Rowenta iron (the one with the separate water reservoir). There will never be another opportunity to get one at 30% off! And it's a good chance to stock up on basics, too—like thread and embroidery floss.
So, yes, everything is on sale and most things for 50% off! I needed to get back here today so I quickly grabbed a basketful of stuff that I knew I'd use, including the fabric I stopped for. You can bet I'll be heading back very soon—like tomorrow perhaps. I have my eye on a professional Rowenta iron (the one with the separate water reservoir). There will never be another opportunity to get one at 30% off! And it's a good chance to stock up on basics, too—like thread and embroidery floss.
4.09.2007
some questions...and some answers
I have to meet with my accountant this afternoon to review my taxes, and am feeling a little rushed today, so I'm going to use today's Stitch School space to answer a few embroidery-related questions from readers and to show off that amazing towel I bought on Saturday.
"My problem is the hoop marks. How do you avoid having hoop marks on your finished projects?"
I always use the heavy plastic hoops that you can buy now. Hoops used to be made of metal or wood, both of which can be a problem. Metal rusts and can leave spots that likely won't come out. Wood can pick up dirt and, if constructed cheaply, splinter and crack. With plastic, if it gets dirty, you can just wash it off with a sponge and some mild soap. Keeping your hoops clean will help to avoid transfering dirt to your work.
There's a technique for binding a hoop with strips of fabric (cut on the bias), woven cotton tape, or bias binding ironed flat, but this seems to be more about getting a firmer tension between the hoop and your fabric. You do it by separating the two sections of the hoop and wrapping the strip around and around the edge of the bottom (or inside) ring, making sure it doesn't crease and taking a few small stitches when you reach the end to secure everything. I suppose this could work to keep your hoop clean, too, but you'd probably need to wrap both rings.
And don't set your project aside for weeks on end in the hoop. I know, you intend to get right back to it, but will you really? Remove your fabric from the hoop after you're done working for the day and that ring-shaped crease won't have a chance to set in.
I do a lot of stamped embroidery projects and always wash them when I'm finished to get out the stamping. Getting the fabric wet generally takes care of any creasing that occurs while I'm working. If you don't want to wash the entire piece, you could try spraying it with water and ironing the creases out. I keep a spray bottle near my ironing board for this very purpose.
"I am planning an embroidery based on a free print of a chickadee, and I am wondering if a part of the head is black, do I outline it in black? And also when part of the head is white, do I then do that in white? Or do I do it all in black as an outline? Hopefully I didn't confuse you."
I'm pretty sure I know what you mean here, and the problem is really with the white embroidery floss. If you're embroidering on white fabric and using white floss to render a white object, how can you see it against the background? It's personal preference somewhat, but here's what I'd do. If I could use a fabric that had a bit of color in it—like a natural linen—then I'd use white for the part of the head that's white. If I had to use white fabric I'd probably outline with black so it stands out from the background. Even if you outline the whole thing with black, there will be open white areas within the design, giving the illusion that the head is white. Or, I'd use a floss color that's almost but not quite white—ivory, pale gray, or that very pale silvery blue color—all would work for a chickadee.
If this isn't what you meant (and I truly am confused), leave a comment here and I'll explain further.
OK, for you cross stitch lovers, this is a stunning example of art deco design done in black and turquoise on heavy linen. The embroidery is completed in a wide band across the bottom and features two monogrammed letters above it. Flawlessly done. I wouldn't normally pay $17 for a tea towel but this was just too beautiful to walk away from. And no, this will not be cut up for a pillow. I may even frame it!
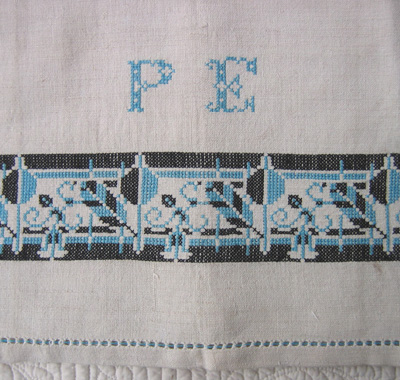
If you click on the photo there are some closeup photos on my Flickr page. Stop back next week for a new stitch!
"My problem is the hoop marks. How do you avoid having hoop marks on your finished projects?"
I always use the heavy plastic hoops that you can buy now. Hoops used to be made of metal or wood, both of which can be a problem. Metal rusts and can leave spots that likely won't come out. Wood can pick up dirt and, if constructed cheaply, splinter and crack. With plastic, if it gets dirty, you can just wash it off with a sponge and some mild soap. Keeping your hoops clean will help to avoid transfering dirt to your work.
There's a technique for binding a hoop with strips of fabric (cut on the bias), woven cotton tape, or bias binding ironed flat, but this seems to be more about getting a firmer tension between the hoop and your fabric. You do it by separating the two sections of the hoop and wrapping the strip around and around the edge of the bottom (or inside) ring, making sure it doesn't crease and taking a few small stitches when you reach the end to secure everything. I suppose this could work to keep your hoop clean, too, but you'd probably need to wrap both rings.
And don't set your project aside for weeks on end in the hoop. I know, you intend to get right back to it, but will you really? Remove your fabric from the hoop after you're done working for the day and that ring-shaped crease won't have a chance to set in.
I do a lot of stamped embroidery projects and always wash them when I'm finished to get out the stamping. Getting the fabric wet generally takes care of any creasing that occurs while I'm working. If you don't want to wash the entire piece, you could try spraying it with water and ironing the creases out. I keep a spray bottle near my ironing board for this very purpose.
"I am planning an embroidery based on a free print of a chickadee, and I am wondering if a part of the head is black, do I outline it in black? And also when part of the head is white, do I then do that in white? Or do I do it all in black as an outline? Hopefully I didn't confuse you."
I'm pretty sure I know what you mean here, and the problem is really with the white embroidery floss. If you're embroidering on white fabric and using white floss to render a white object, how can you see it against the background? It's personal preference somewhat, but here's what I'd do. If I could use a fabric that had a bit of color in it—like a natural linen—then I'd use white for the part of the head that's white. If I had to use white fabric I'd probably outline with black so it stands out from the background. Even if you outline the whole thing with black, there will be open white areas within the design, giving the illusion that the head is white. Or, I'd use a floss color that's almost but not quite white—ivory, pale gray, or that very pale silvery blue color—all would work for a chickadee.
If this isn't what you meant (and I truly am confused), leave a comment here and I'll explain further.
OK, for you cross stitch lovers, this is a stunning example of art deco design done in black and turquoise on heavy linen. The embroidery is completed in a wide band across the bottom and features two monogrammed letters above it. Flawlessly done. I wouldn't normally pay $17 for a tea towel but this was just too beautiful to walk away from. And no, this will not be cut up for a pillow. I may even frame it!
If you click on the photo there are some closeup photos on my Flickr page. Stop back next week for a new stitch!
4.08.2007
happy Easter
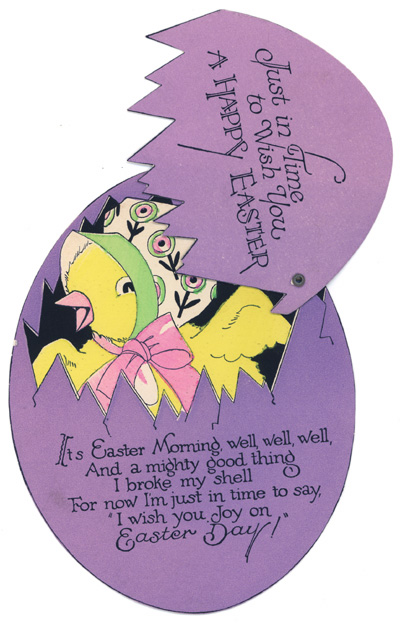
This is a vintage Easter card I found at an antique mall yesterday. The top shell is hinged at the corner so it can be closed at first, then opened to reveal the chick inside. Love the art! It's very similar in style to an old embroidery book I have from the 1930s so I'm guessing it's from that era. It was a great shopping day—lots of buttons, pretty trims, and a really spectuacular embroidered towel that I'll show you soon.
Hope you all have a happy Easter!
4.04.2007
towels
So many people asked about where I buy towels after yesterday's post so I'm going to share my source. There's a great online company called Embroider This and they carry a wide variety of what are called embroidery blanks—everything from baby bibs to hemstitched linen tablecloths. I like the McLeod Tea Towel in white (also available in cream, chambray blue, and with colored stripes). They also have 100% cotton Flour Sack Towels in sets of three, Natural 100% Linen Towels, and Huck Towels with and without hemstitching. All of these have a slightly different texture and weight but work equally well for embroidery.
Their prices are reasonable and you can save even more by buying larger quantities. That may be too many if you just want to make a few towels for your kitchen, but comes in handy if you're making a lot and need to keep your costs down.
While you're there check out some of the other categories. They do sell embroidery supplies but the emphasis is on machine embroidery, something I consider cheating. It's so satisfying to do embroidery by hand and (in my opinion) doesn't take much skill to set up a machine to do it for you. Sure, it's faster, but I think I prefer the slight imperfections in hand done work. You know the person who created it was personally involved in the process.
Their prices are reasonable and you can save even more by buying larger quantities. That may be too many if you just want to make a few towels for your kitchen, but comes in handy if you're making a lot and need to keep your costs down.
While you're there check out some of the other categories. They do sell embroidery supplies but the emphasis is on machine embroidery, something I consider cheating. It's so satisfying to do embroidery by hand and (in my opinion) doesn't take much skill to set up a machine to do it for you. Sure, it's faster, but I think I prefer the slight imperfections in hand done work. You know the person who created it was personally involved in the process.
4.03.2007
blueberries can dance?
Of course, they can. Especially when they take center stage on a tea towel! Last week I finished a custom order for one of my Blueberry Ballet tea towels. I started decorating and selling tea towels last year and sold out of the ones listed on my site. They take a while to make and I haven't had time to restock my supply so I usually do them as custom orders. This design is one of my favorites.


I start with a purchased towel and add coordinating fabric along the bottom edge—in this case a realistic blueberry print. And I slip in a row of blueberry-blue jumbo rickrack as I'm sewing the top edge—the bottom scallops catch in the stitching. You could sew it on top, too.
The blueberry motif is from a vintage Vogart iron-on transfer pattern that I got on Ebay several years ago. Lucky you—you don't have to go through the trouble of finding it. It's called Happy Fruits and you can buy copies at Patternbee. It's a cute design and there are others in the same set that feature all sorts of fruits, each with a funny saying if you want to include it with your finished design. The drunken pear ("Stewed Fruit") and the kissing apples ("Apple Sauce") are really too funny.
The embroidery goes quickly—it's mostly outline and straight stitch with a few lazy-daisy leaves and satin stitch eyes.

Really easy to do these yourself, but, if you don't feel like going to the trouble, I'll be happy to help you out. Unfortunately I can't promise a speedy turnaround at the moment as I'm getting kind of booked up for April. I'll probably write about some of my new projects here during the next couple of weeks. When you have a blog anything and everything becomes fair-game for a post.
I start with a purchased towel and add coordinating fabric along the bottom edge—in this case a realistic blueberry print. And I slip in a row of blueberry-blue jumbo rickrack as I'm sewing the top edge—the bottom scallops catch in the stitching. You could sew it on top, too.
The blueberry motif is from a vintage Vogart iron-on transfer pattern that I got on Ebay several years ago. Lucky you—you don't have to go through the trouble of finding it. It's called Happy Fruits and you can buy copies at Patternbee. It's a cute design and there are others in the same set that feature all sorts of fruits, each with a funny saying if you want to include it with your finished design. The drunken pear ("Stewed Fruit") and the kissing apples ("Apple Sauce") are really too funny.
The embroidery goes quickly—it's mostly outline and straight stitch with a few lazy-daisy leaves and satin stitch eyes.
Really easy to do these yourself, but, if you don't feel like going to the trouble, I'll be happy to help you out. Unfortunately I can't promise a speedy turnaround at the moment as I'm getting kind of booked up for April. I'll probably write about some of my new projects here during the next couple of weeks. When you have a blog anything and everything becomes fair-game for a post.
Stitch School: Vandyke Stitch
Stitch School has moved to it's very own space on the web! You'll now find the Vandyke Stitch post here. Comments are now closed on this post; if you'd like to leave a comment please do so on the new one.
Subscribe to:
Posts (Atom)