12.20.2009

vintage treats

You'd think that working at home would give me lots of free time to get ready for the holiday. Like doing some decorating, wrapping presents (at least I have presents), and baking. But so far that hasn't happened. Now that Christmas orders have slowed, maybe I'll get some time this week.

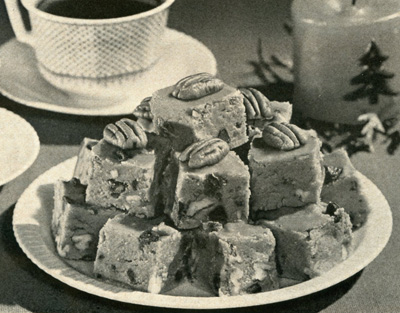
I'd like to try this recipe that I clipped from one of those 1960s women's magazines I found at the flea market. I haven't made fudge for ages and coffee, chocolate, and pecans sounds like the perfect combination of flavors to me. Here's the recipe in case you'd like to try it, too. I'll let you know how mine turns out.

fudge

Coffee Dot Fudge

3 cups sugar
1 cup milk
1/2 cup light cream
2 tablespoons instant coffee
1 tablespoon light corn syrup
dash salt
3 tablespoons butter
1 teaspoon vanilla
1/2 6-ounce package semisweet chocolate pieces
1/2 cup broken pecans

Butter sides of heavy 3-quart saucepan. In it combine sugar, milk, light cream, instant coffee, corn syrup, and salt. Heat over medium heat, stirring constantly, until sugar dissolves and mixture come to boiling. Then cook to soft-ball stage (234°), stirring only if necessary. Immediately remove from heat; add butter and cool to lukewarm (110°) without stirring. Add vanilla. Beat vigorously until fudge becomes very thick and starts to lose its gloss. At once stir in chocolate pieces and pecans. Quickly spread in buttered shallow pan or small platter. Score into squares while warm and, if desired, top each with a pecan half. Cut when firm.

Better Homes & Gardens, December 1961

12.17.2009

an amazing embroidery project

I'm not posting this to intimidate those of you who are just learning embroidery. Trust me, some day your work will be good enough to tackle more ambitious projects than the ones you're starting out with. Although this project may be more ambitious than you'll ever do, keep in mind that much of the work was completed by ordinary people who spent a few hours or days of their vacations helping out. I had to share because the finished result is so amazing and gorgeous. The Boston Globe published an article about the project a few days ago but I would have missed it if Kathleen Fasanella hadn't mentioned it on her Fashion-Incubator blog.

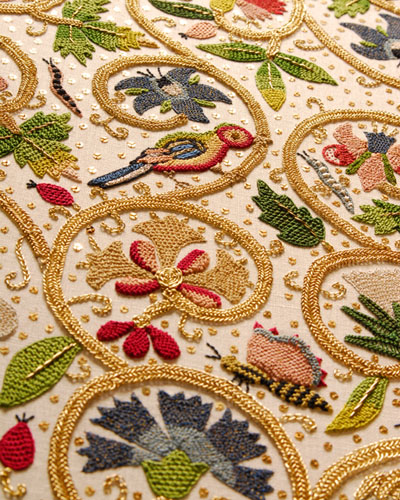
Three years ago Plimoth Plantation was planning an exhibition on how America's founders dressed themselves and wanted to re-create a lavishly-embroidered 17th-century women's waistcoat as the centerpiece of the exhibit. They approached Tricia Wilson Nguyen, a specialist in historic needlework, to see if she would lead the ambitious project.


Photo by Ed Nute

“I told them they were totally crazy,’’ said Nguyen. She knew it could take hundreds of people thousands of hours to do the intricate needlework, using a centuries-old embroidery stitch few people know. As if that wasn’t enough challenge, the materials needed - silver gilt threads, hand-cut sequins - had been out of production for centuries and would have to be reinvented.

The design is based on two jackets in the collection of the Victoria & Albert Museum in London. It's a tight-fitting linen waistcoat heavily embroidered with curling vines, silver gilt stems, gold sequins, gold and silver metal lace, and a wild assortment of flowers, leaves, birds, insects, and three-dimensional butterflies.


Photo by Ed Nute

The project, which was unveiled a few days ago, took three years, cost $12,000, and took the embroidery skills of more than 250 people, most of them volunteers, to complete and construct the jacket. You can follow the story of it's creation on Nyguyen’s site Thistle-Threads and on Plimoth Plantation's The Embroiderer's Story.

A few months ago they received some bad news. Because of budget cuts and fund-raising shortfalls, the museum was forced to cancel the exhibition that inspired the jacket. Although Plimoth Plantation will still own it, the jacket will spend the next two years at the Winterthur museum in Delaware, which has a large collection of textiles and needlework. After that, it will return to Plymouth in hopes that the exhibition will be revived.

Nguyen is convinced that the jacket is the most ambitious embroidery project since
Queen Elizabeth ll’s coronation robe and contends it is as fashionable now as it was in the 17th century.

“It’s very stylish,’’ she said. “I hate to say it but, God, it looks great with jeans.’’

I've been wanting to go to Winterthur for ages (it's a couple of hours drive for me) - this might be just the attraction to get me there.

12.03.2009

sticky fingers, sparkly stars

When some of the shop owners where I sell asked for holiday ornaments for their stores, my first reaction was "I don't have time for this." I'd been doing so much sewing and the thought of making one more item wasn't very appealing. But, I hate to disappoint, so I asked myself what else I could do that would fit in with the Primrose Design look. Here's what I came up with—and what I've been working on for the past week. There's a lot of down time with these while they dry in between the steps, so you can easily jump back and forth from other pursuits. I've been doing bookkeeping and I'm quite sure you don't want to hear about that!

star ornament
An almost finished ornament—I'll probably add a few more pearls

Here's are the supplies you'll need to make these:

supplies

• flat unfinished wood stars*
• a drill for making the hanging holes
• white acrylic paint (FolkArt 901 Wicker White)
• glue (Aleene's Glass and Bead)
• buttons (white, pearl, rhinestone) in a variety of shapes and sizes
• seed pearls, or pearl beads
• decoupage medium (Plaid Mod Podge)
• sewing needle
• thread for hanging (I used metallic silver)

in production
Put some paper down on your workspace—this could get messy!

1. Drill a hole in one point of each star. A power drill really helps because they have a tendency to break or crack. Don't get too close to the edge.
2. Paint each star with acrylic paint—a couple of coats, and don't forget the edges.
3. Now for the buttons. Start at the point with the drilled hole and place a button over it so the holes align. This is where the hanging thread will be added later. You can either apply glue to the wood and then press the button on or apply it to the button itself (that's where the sticky fingers come in). You'll get the hang of arranging them after a while. You'll want a good mix of sizes, shapes, and shades of white, and to cover the surface without leaving too many open spaces or overlapping the outer edges too much. Use smaller buttons on the points and larger one toward the center.

vintage buttons
Vintage buttons!

4. After you have a base layer of buttons, go back and add a few more to cover any open spaces. Flat buttons can rest on top and buttons with shanks are perfect for filling smaller oblong openings. The seed pearls are to fill any really small holes, especially near the edges. You're going for a layered, crusted look—think royal treasure storeroom or pirate's treasure chest—the more the better. I wanted an all-white look for mine but you could add silver or gold beads, trinkets, or charms. It's a small "canvas" so anything smallish will work well.

star ornament
It's hard to be neat with this glue but it's shiny so adds to the sparkle.

5. Once you're happy with the results, let the whole thing dry.
6. Paint the back side with the decoupage medium for a shiny, glossy finish. This works as a glue, too, so you can add a little logo or message that you've printed on paper to the back. If you do this you'll need a few extra coats (with drying time in between).
7. Take a needle and make sure the hanging hole is clear (it gets gummed up with glue and paint and Mod Podge). Then string your hanging thread through the hole and knot it. And you're done.

star ornaments

Six of the finished ornaments are off to Hello Bluebird today but I've got plenty of buttons left so I'm going to keep going. They're really pretty and I'm sure I'll find a use for them :)

* You can find these in craft stores like Michaels and A.C. Moore. My local stores only had one size and I wanted something slightly larger, so I bought the 4" size at Woodworks, Ltd. They have a wide variety of shapes including primitive stars (less-sharp points) and hearts.
11.25.2009

slightly torrid

That's a quote from "Mr. Blandings Builds His Dream House", one of my favorite movies ever. Myrna Loy plays wife to ad man Cary Grant and when they finally move into that dream house, their daughter accidentally discovers her mother's diary from college in one of the boxes. She reads it and declares it "slightly torrid." The movie is full of funny lines in the style of dry humor that I particularly like, but you can rent it and see for yourself.

The point of this is that "slightly torrid" is a good way to describe a new embroidery pattern that I've just listed. The originals are a set of pillowcases from the early 1960s with ready-for-bed kitties perched on crescent moons surrounded by stars to depict the night sky.

able

The male, dressed in a night shirt and cap, holds a candle and the word "Able" is spelled out above his head. The female, looking very come-hither in an off-the-shoulder nightgown, rose, and cigarette holder has the word "Willing". Cute and silly and just a little risque—at least it was at that time.

willing

I've wanted to trace this pattern for years but I only had the female pillowcase. I made a pillow from it and foolishly didn't make a scan of the piece before embroidering it. Then I found the male pillowcase but it was poorly embroidered. I can sometimes trace a pattern from a finished piece but it's more difficult. I started but wasn't happy with how it was coming along.

sexy kitty pillow

Last month I found the complete set—not yet started and with the original printed instructions. Yay! So here they are. The pattern, called Bedtime Cats, is available as a PDF or printed pattern. Also just listed is Lovely Lilacs, a pattern with a selection of lilac sprays for use on towels and a tablecloth/napkin set.

I'll make pillows again from the originals and now you can, too. Won't they look great in a vintage-style bedroom?

11.10.2009

thanks

Thanks for all your kind words in comments to yesterday's post. I ended up going to bed really early Saturday night because I was so tired after the show, but I woke up to three orders, got two more on Sunday, and shipped three more packages this morning. So, I know it isn't a matter of people not liking my things. They just seem to live in places like California and Texas!

The area where I live is tough. The malls are packed every weekend but small independent stores, not so much. And that's why, as much as I'd love to open my own shop, I hesitate to do it. It would look great—sort of an extended version of my craft booth—and I have so many craft-making friends with businesses that I know I could pack it full with cool things to buy. But would anyone here buy it? I just don't know how to get people to appreciate handmade things, and the effort that goes into making them. With the continued economic problems that's a harder sell than usual.

Didn't mean to ramble on about that but what I wanted to say was that I did meet some great people at the show. The booth next to me was a jewelry designer from a local bead store and she said I should stop by to talk about consigning some of my small accessories. I heard about some of the local shows that will be good for next year. For example, the library I go to is having an Artisans Market this Friday night and all day Saturday. I'm too late for this year but they tell me they're planning to do it again. And I talked to another local woman with a shop and I'm meeting with her on Friday and probably doing a local show sponsored by her shop in December.

So, even if you don't make a lot of sales at a show, you just might make some valuable contacts along the way. And I think it's good to get out and become part of the local craft community. Maybe together we can spread the word about how great handmade crafts are!

11.09.2009

craft show report

I know you're all dying to know how it went and I have good and bad news. The good news is that my booth went together with only a minor hitch or two. The vintage folding table that I had under the window in my studio—the one that supports both of my cats who love to sleep there in the sun every morning—broke as soon as I tried to open it up. So, I hauled it home and borrowed a table from my hallway. And I was against a wall—sort of. The show was held in a gym so the wall behind me was padded and striped white and blue, but I was able to hang my flower banner across the back.


Here's the 8' back table that I rented from the school, complete with polka dot table toppers and products galore.

tea towels
I hung embroidered tea towels from a vintage quilt rack that I painted off white and stacked towels without embroidery below.

mini wallets
Mini wallets were arranged on long plastic trays that I got from Target; they matched the fabric just about perfectly.

There are lots more pictures on my Flickr page.

Now for the bad news. Attendance was way down this year and people just weren't buying. I made just three sales and two of those were to other vendors. I'm trying not to take this personally because I got lots of compliments about my things. A very nice man who made handmade jewelry heard it was my first show and stopped by to tell me to not be discouraged. He didn't have any sales either, although that may have been due to the fact that 27 of the 83 vendors were jewelry, and not all of it handmade.

So, I learned that I can make my booth look just like I'd pictured it in my head. It was a great ego boost to hear how much people liked my work. I did make back my booth fee - barely. Will I do this show again? Maybe. But, it hasn't made me give up just yet. I'm about to sign up for another show the first weekend in December so I'll have more craft show adventures to tell you about soon!

11.02.2009

hen party

Speaking of birds, I recently listed a new embroidery pattern on my website. Called Gossip Girls, it's a design taken from a vintage stamped-for-embroidery clothespin apron, and it features two hens—one in a polka dot bonnet, the other in an apron—gossiping over a fence. Such a cute design and one I hadn't seen before. Eventually I'll get to embroidering the original apron (found on Ebay) but I traced the pattern right away!

gossip girls

I've also added the option of purchasing my patterns as PDFs instead of printed copies. It's always been a problem for international customers to order patterns because the shipping can be outrageously high—often more than the pattern itself. It also solves the problem of being able to use the patterns over again—you can just print out a new copy. All you need to view and print the files is Adobe Acrobat Reader and you can download it for free here if you don't already have it on your computer.

Being able to offer PDF patterns also solves a huge problem for me, one that's prevented me from selling some of the larger designs. I'm only able to print 8 1/2 x 11 sheets on my printer and some patterns are larger than that (this new chicken one, for example, is 8.5" x 12"). For my own use I can print them in sections and tape them together but I can't sell and ship them like that. The customer, having the pdf in hand, can print out a new copy whenever she needs it. And with the option of printing the designs larger or smaller, depending on your project.

So, look for more larger designs soon. In the meantime check out the other great patterns I have for sale. If you like chickens, you'll love #VP103 Poultry Diner!

10.29.2009

pancakes + jelly = fun

Wow! I always thought this was something my mother invented herself. Whenever I've mentioned to anyone in conversation that I used to eat pancakes layered with grape jelly they've looked at me like I was crazy. Now I have proof that such a thing existed and was called a jelly stack!

I found this ad while going through a pile of 1960s women's magazines that I've had hanging around for a couple of years. I'm trying to clean up my studio a bit and thought I'd go through them and pull out the good bits for future reference.

jelly stack

My mom would have read these magazines (Better Homes & Gardens, McCalls, Ladies Home Journal) and many of the recipes for the casseroles we ate as kids came from their pages. I've already mentioned the dreaded spam and canned salmon concoctions, but some of the recipes were actually pretty good! Of course, I moved on from grape jelly long ago so I might substitute cherry or peach jam today. It sounds like a nice change from maple syrup.

10.27.2009

An interview with Sharon Stark

Please welcome Sharon Stark from Sharon's Antiques: Vintage Fabrics and The Rickrack Rag who’s agreed to do an interview about feedsacks. Sharon lives in southeastern Pennsylvania and has been collecting and selling feedsacks for more than 11 years.


Let’s start at the beginning. How did you get started collecting and selling feedsacks?

The feedsack business resulted from a number of coincidences. First, my husband and I have been into antiques for years, both separately and together. When we got together, he had a used bookstore and I operated a stand selling general antiques at a local antique market.

We started selling on eBay in late 1997, as the internet began to make big changes in the marketplace. One major change was in my husband’s field, used books, and it became less practical to have a physical store instead of an online presence. So we decided he’d give up the store and sell online.

He found free webspace and started a list of books for sale there, also listing with a service that included a national selection of booksellers. Since he had created the website for his books, he looked around to see what sort of website would benefit my business, and what items would lend themselves to sale online. While selling on eBay, we found that feedsacks (we had always called them feed bags) had begun to sell for more than the dollar or two that they usually brought around here. Since they were easy to scan (we didn’t yet have a digital camera), we selected feedsacks for our beginning web site.

You live in a great area of the country for finding feedsacks with lots of farms and Amish communities. Do you find most of your feedsacks locally or do you travel to find them?

We find most of our feedsacks at farm sales and auctions in our local area, though we have bought them from friends as far away as Nebraska and even California. We also scour local antique markets and co-ops for feedsacks. When the Feedsack Club was in operation, we were members and bought lots of them at the annual conventions. And as our website grew, we were sometimes even able to buy some on eBay to resell on our site.

As far as traveling, we don’t travel a lot anyway, but when we do, of course we stop at antiques shops and look for feedsacks and other textiles, but nowhere are they as plentiful as in our local area.

10.23.2009

gone awol

Sorry for the lack of posts this week. And I was doing so well lately, too. On top of getting ready for the craft show, one of the shop owners where I consign emailed and said she needed more stuff so I quickly diverted some of my show products to her. And cut out more tissue cozies and wallets to make up the difference.

And I'm in the last stages of refinancing our mortgage, so fielding lots of phone calls. I'm glad I'm not as unorganized as the people who work at the bank - I'd never get anything done. The paperwork isn't quite ready for closing, my lawyer still needs to review it all, so I have no idea when this is going to actually happen. Hopefully/maybe next week.

When there's not much to talk about you can't go wrong with a cute kitty picture. Here's one of mine sleeping on top of an old quilt in a laundry basket. I must have walked past about ten times before I realized she was there. The basket is full of things to be ironed, another project on my very long to-do list.

queen of the hill

Be sure to stop in next week for my interview with Sharon Stark of Rickrack.com; we'll be chatting about feedsacks!

10.15.2009

dem bones

scrollsTreasure hunting with others in tow can be fun, but you probably shouldn't go with people who are looking for the same things you are - that could get ugly. My hunting partner is often my husband and he goes with his own mental "list". I do have him trained to spot feedsacks and buttons though. If he wanders ahead, he comes back frequently to alert me about booths of interest ahead. And I keep an eye out for things of interest to him. Like the Chinese enamel dishes he collects. For our trip last weekend the interest was old dominoes.

mixed box

angelIt started with an entire box of them for $3 at an outdoor flea market located in the park adjacent to the indoor flea market. Then he found two full sets in their original long boxes, including one with colored dots. I know what you're thinking—what's so special about dominoes? Just look at how cool the designs on the backs are! Could that be the Greek goddess Artemis surrounded by a border of little flowers? Scroll designs are always pretty and the dominoes in the mixed box have scrolls on the fronts and the backs. The ones in the long box have Empire State Buildings on theirs.

long box

scroll frontDominoes are sometimes called "bones" because the earliest ones were made from animal bone. The most sought-after and rare are made from ivory inlaid with ebony—since 1989 it's illegal to produce dominoes (or anything else) from real ivory. You can also find them in vegetable ivory (from the Tagua nut), bakelite (1907-1950s), wood, plastic, or even thick cardboard. Dominoes are generally either white with black dots or dark with white dots. The colored sets, with one color per suit, make it easier to find matches—just connect the colors. Here's a little history and more information about dominoes if you're interested.

This sudden interest in dominoes doesn't come as a complete surprise. It really started two years ago with the purchase of this domino-covered box at a New Hope, PA antique store. Isn't it cool? I've seen boxes covered with seashells before, and ones with matchsticks, but never one with dominoes. Because of their small size, the artist (this is definitely handmade) was able to fit a lot onto the box. And the stacked dominoes to create a handle—so clever!

domino box

So, when we get tired of playing with our dominoes there are a few boxes around here that would look great covered with them :)

10.13.2009

Road Trip: Lewisburg, Pennsylvania

We arrived at Roller Mills, a three-story antique mall in a restored 1880s flour mill, about 10:30 am to find that, contrary to what it states on their website and signage, they don't open until 11:00. We ran into a lady in the parking lot who told us this and it would have been nice to know so we could better plan our 2-hour drive. But, she told us to drive down the street to check out the flea market and that was great advice.

vintage buttons
Plastic flowers, carded silver-rimmed, and cool 1950s polka dot fabric-covered buttons.

Named The Street of Shops and located in a restored historic woolen mill, the upstairs features a row of shops selling country crafty things (if you're into that kind of thing; I'm not) and the downstairs is a flea market with a weird mix of stuff—some kitschy knick-knacks and collectibles and some vintage and antiques. I found tons of buttons, a few hankies, and a sealed package of cotton pillowcases from the 50s for $4 (love that vintage cotton!). The back had rooms of furniture, all for amazing prices. If I ever open a shop of my own I'll keep this in mind for shop display furniture. Still coveting that painted iron 3/4-size bed but I had no way to fit it in the car!

birdhouse
Doesn't this look like it was made from a berry basket?

Back at Roller Mills, I found more buttons, the birdhouse shown here, and an old feedsack baby dress with red trims—rick rack, prairie points, and manufactured flower ribbon. I seriously considered an antique free-standing chalkboard with rolling pictures in the top panel but, at $85, it was a bit much to spend for something I don't really need.

feedsack dress
Click through to my Flickr page for a larger version and a closeup photo of the detail.

We were disappointed to find that the town itself was virtually shut down on Sundays—something to think about if you want to do any shopping along the main street. We weren't sure we could even find a place to eat a late lunch but stumbled across a gem in the Lewisburg Hotel. We would have been happy with a sandwich or salad, but the dinner menu looked so good that we opted for an early dinner instead. I wasn't looking forward to cooking after the drive anyway, and it turned out to be a good decision because we were stuck in traffic on Rt. 80 forever and got home much later than we thought we would.

On the way out of town we stopped at the Silver Moon Antique Mall, which has changed locations since my last trip here. It's smaller with less antiques and more collectibles, but I found more buttons, some aprons (including two from feedsack), and this gorgeous blue sewing basket with woven sides and floral decal on top ($15). There are even some usable buttons and trims inside!

sewing basket

sewing basket

It was a long day, but it's nice to revisit places you haven't been back to for a while. Pennsylvania is such a large state that you often have to do a bit of trekking to find the good stuff.

All Lewisburg, PA 17837:
Lewisburg Hotel, 136 Market Street
Street of Shops (first-floor flea market), 100 N. Water Street
Roller Mills Antique Center, 517 St. Mary Street
Silver Moon Antique Mall, 150 Silvermoon Lane (2 miles north on Rt 15)

10.05.2009

a lesson in color and contrast

Have any of you seen Timeless Treasures' new fabric collection named 'Lena'? And the pattern within named Daisies & Disks? Doesn't it look familiar? It should if you've been reading my blog over the past month. Remember that gorgeous feedsack I showed you from my trip to Kutztown a few weeks ago? This one—

feedsack

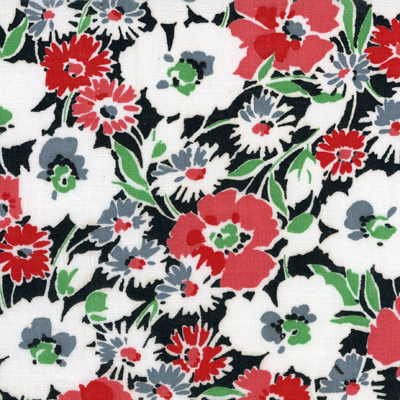
Well, I was over at eQuilter.com this morning checking out some of their new arrivals and came across the reproduction, available in three colorways—orange and purple (shown at left), and blue.
I'm not even going to get into how uneasy I feel about modern fabric designers 'borrowing' old designs, changing a few details and colors and calling it their own (it's happened before). Or the fact that five years from now you'll be seeing this on eBay being passed off as feedsack by someone who doesn't know any better (I've seen that, too).

What bothers me most are the color choices. I believe I mentioned when I first posted my photo how I loved that the very bright red-orange flowers popped against the subtle gray background. Now look at the two colorways shown here. See how the background is the first thing you notice in the orange example, and how the background and red flowers fight for dominance in the second.

And there's something missing, isn't there? The dark navy accent color used for definition in the flower centers and for the striped half circles is no where to be found. And it needs to be there. When you have colors that are the same tone, you need an element to provide contrast, and the addition of a very dark color (or black) would have helped with that.

They were probably thinking that if they swapped brighter fun colors for the original gray, it would appeal more to younger modern sewers. Personally I think the older colorway, which is perfectly balanced to my eye, looks more modern than any of the new variations.

And FYI, I'm a grump about old classic movies being remade to appeal to modern audiences, too. One of my favorites is Father of the Bride with Spencer Tracy and Elizabeth Taylor. All I can say about the remake, also called Father of the Bride, is that Steve Martin is no Spencer Tracy :)

10.03.2009

veggies

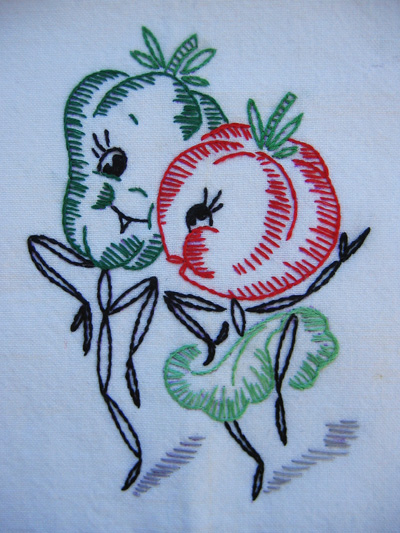
I usually make my fruit and veggie towels as custom orders, but I thought I'd make up a few for the craft show I'm doing next month (more about that later). I have a cool, old, wooden towel rack with feet that's the perfect size to sit on a tabletop. I'll hang the embroidered towels, like the one shown here, on the rungs and pile the simpler towels (the ones with fabric and rickrack) on the table below.

veggie towel

This design is called Vegetable Polka and has a cute green pepper and tomato dancing. Don't you love her ruffley lettuce leaf skirt? Yes, those are tiny tomatoes in the feedsack fabric along the bottom!

veggie towel closeup

I have the original of this pattern that I won on Ebay a couple of years ago. You can purchase a reprint of the design, along with Garden Waltz (featuring a carrot and beet) and various other musical motifs at Patternbee here. Really cute for tea towels!

Sorry for disappearing last week. I spent ten hour days in my studio sewing products for the upcoming show. I have no idea how much product to bring but I figure, better to have too much than too little!

9.24.2009

colorways

Finding nice vintage fabrics is a challenge. Finding two of the same pattern in different colorways is a miracle!

gray-green-red colorway
Gray, green, red, black and white

blue-red-yellow colorway
Red, yellow, blue, navy and white

And, no, I didn't find them together. One was an Ebay purchase and I can't remember where I found the other. I thought at first it might be feedsack but the fabric is much too light in weight—definitely not sturdy enough to have been filled with grain or flour.

9.21.2009

pods from outer space

Can anyone help me out with identifying this plant?

pods

I found lots of them growing on the edges of my yard. The plant is a single very thin vine with corkscrew tendrils that wrap around anything near it—trees, blackberry bushes, tall weeds. And the seed pods look like something from a science fiction movie. They're quite heavy for the size of the plant's stem and hang straight down. And they look fuzzy from a distance but are covered with green spikes. The seeds inside are suspended in a greenish goo and are about the size and shape of pumpkin seeds. In the young pods they're white; in the more mature ones they're brown like this:

pod : opened

I'm quite sure they're something I don't want growing in my yard because I can see them taking over (that science fiction movie thing again). I just want to know what they are. Anyone?

pod

Thanks to K who identified this as Wild Cucumber (Echinocystis lobata). You can see more photos here.

9.18.2009

not quite chicken scratch

This is the last of my finds from last weekend's trip to Kutztown.

gingham1

The seller who I bought this from had two and the first was traditional chicken scratch made into a pillow top (another idea for using this style of embroidery) with a ruffled edge. Nice but nothing you hadn't seen before. The one I bought had that little something extra. More like a lot extra!

gingham4

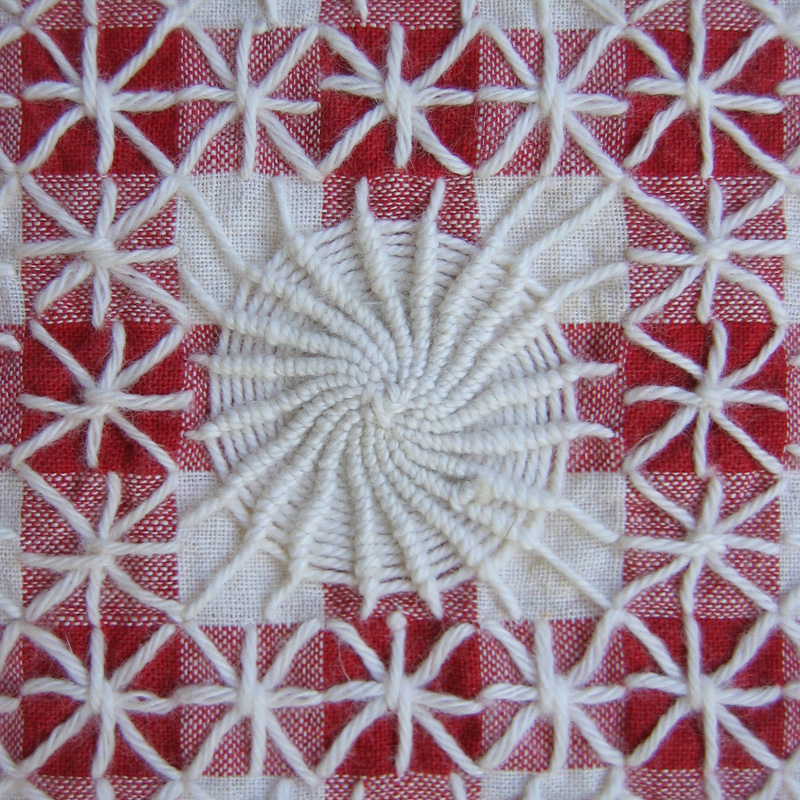
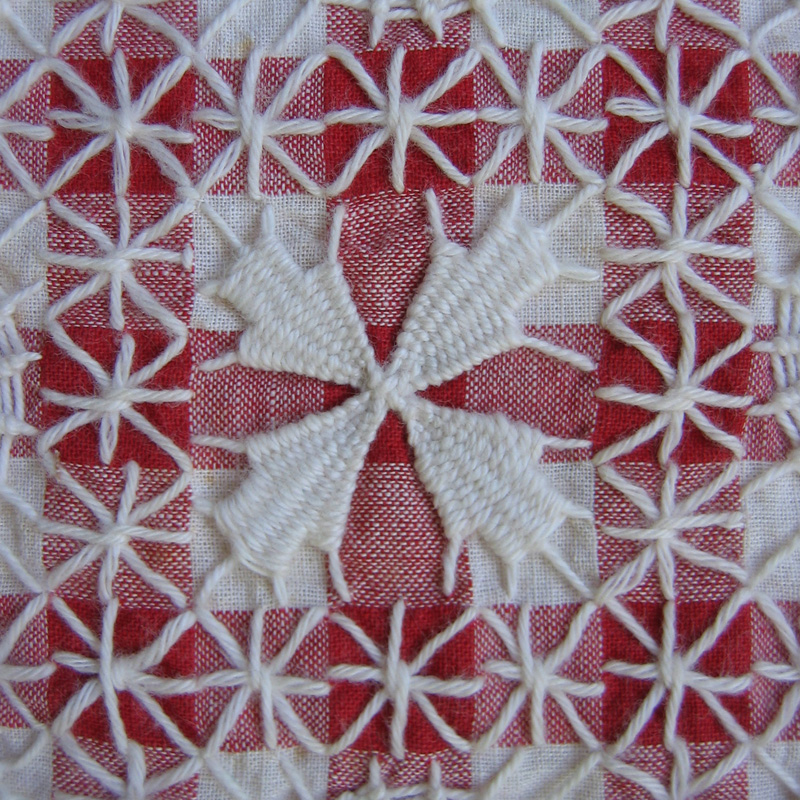
The small crosses have a twisted thread which is a great variation of the traditional double cross stitch. To do this variation, make your cross first, then the straight line from left to right. Then, when making the final stitch from top to bottom, loop your thread over the center of the crossed threads and the left-to-right thread.

gingham5

There are also great examples of the ribbed spider's web stitch using twenty threads and skewed into a spiral. This is done a little differently than the spider web stitch. Instead of simply passing under and over the cross threads, the threads get wrapped over each cross thread, forming a raised tube. It could be straight but, in this example, it's twisted to form a spiral. Will have to try this to figure out exactly how it was done.

gingham3

The spiral designs alternate with woven crosses, also done over twenty base threads. In this design the thread is woven in four sections back and forth over the five threads in each corner.

gingham2

All done in ivory-colored lightweight wool on a heavyweight red gingham background. It looks just like lace from a distance. I can't even imagine how long it took to make this—the work is flawless. I'll probably frame this piece because it really does deserve to be preserved and, because the threads sit on the surface, it could easily get snagged.

Updated to add the size of this piece, which I should have stated before because it has so much going on in a not-very-large space. It's just 18 inches square and each spiral block is 1.75 inches across!

9.15.2009

unusual apron pocket

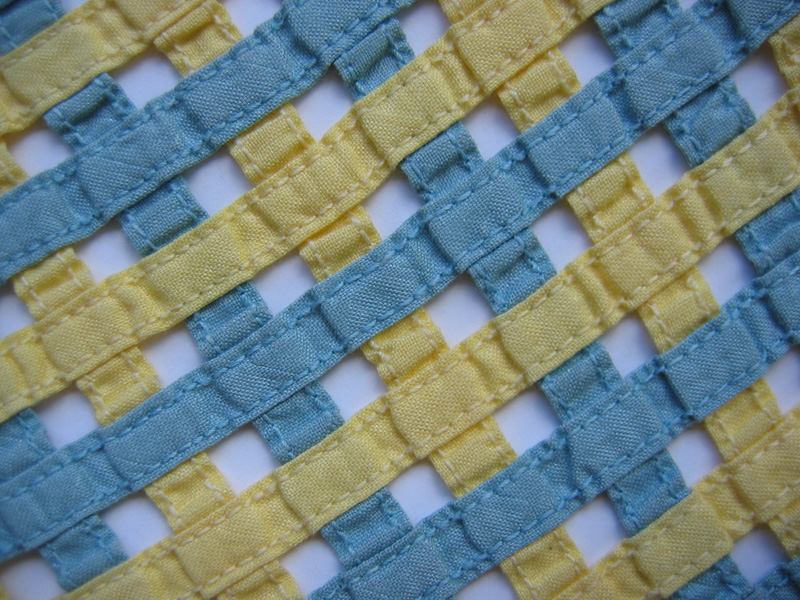
The apron itself is very simple—just plain solid yellow cotton—but the pockets are amazing.

apron pocket

Blue and yellow binding strips form a lattice. Yellow binding holds it all together along the outside edges where it's sewn to the apron body.

apron pocket closeup

I can't quite figure out how this was sewn since the stitching runs over areas that are open underneath. Any thoughts, dear readers? Would it help to see the back side of it? No matter how it was sewn, it's really pretty and unusual.

You could use the same basic idea to sew the strips onto a background fabric—creating a three-dimensional lattice. And then add appliqued or fabric flowers on top. I'm envisioning a pillow here if you couldn't tell :)

Updated to add a link to a photo of the back side.

9.14.2009

more feedsacks

It's been a feedsack kind of summer for me. I keep finding really pretty ones in patterns I haven't seen before and for reasonable prices, too. These are from my trip to Kutztown on Saturday.

feedsack
The dark lines on this are actually a very dark blue, not black as I originally thought.

feedsack
So much going on with this one; I love the contrast between the geometric background and the bright red-orange daisies on top.

feedsack
I love the bright colors on this but the pattern is kind of a mess; it's a smallish piece and I'll cut it up for bags or tissue cozies.

Otherwise it was a pretty miserable day. It rained all the way there and most of the way back and my eyes were so stressed from driving in all that mist and water that I had to take a nap when I got home. But it was fun being back in Kutztown again and visiting some of the same vendors who were selling at the farmer's market when I went to college there many years ago. Most things were different on the main street, although a few shops were still there. A friend's house at the top of the hill is now a used book store which is sort of funny. She and her roommates were all big readers and their rooms sort of resembled a used book store when they lived there. Overflowing shelves and books piled up here and there. Hee :)

I found a few very cool needlework/sewing-related things that I'll show you in the next couple of posts. Stay tuned!